In the dynamic world of smartphones, staying within a budget doesn’t mean sacrificing performance or features. With the continuous advancements in technology, the year 2024 has brought forth a wave of budget-friendly smartphones that pack a punch without breaking the bank. If you’re on the lookout for a new smartphone under ₹10,000, you’re in luck! We’ve curated a list of the top 5 budget smartphones launched in 2024 that offer exceptional value for money.
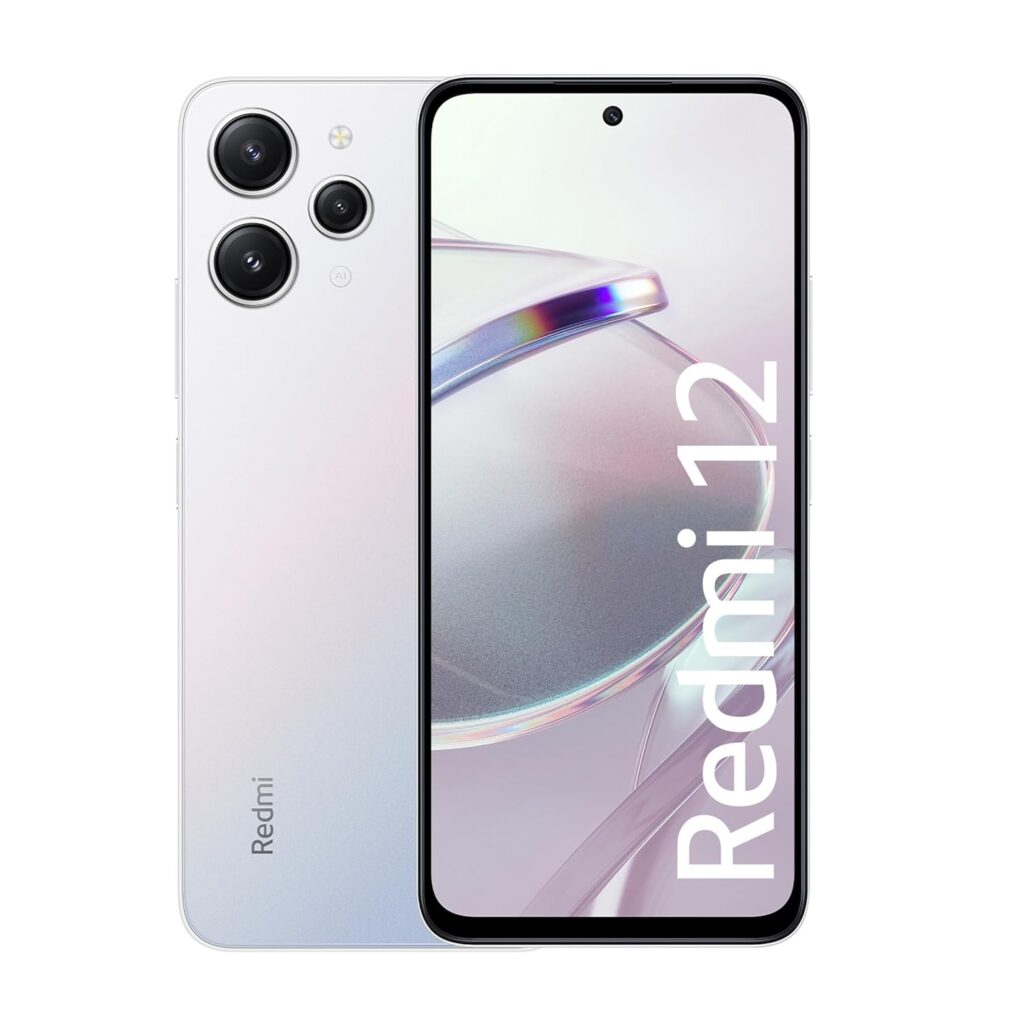
The Redmi 12 from Xiaomi delivers a compelling combination of features and affordability. With its 6.6-inch FHD+ display, MediaTek Helio G35 processor, and 4GB of RAM, this device offers smooth performance for everyday tasks and light gaming. Its triple-camera setup, featuring a 50MP primary sensor, captures stunning photos, while the large 5000mAh battery ensures long-lasting usage on a single charge.
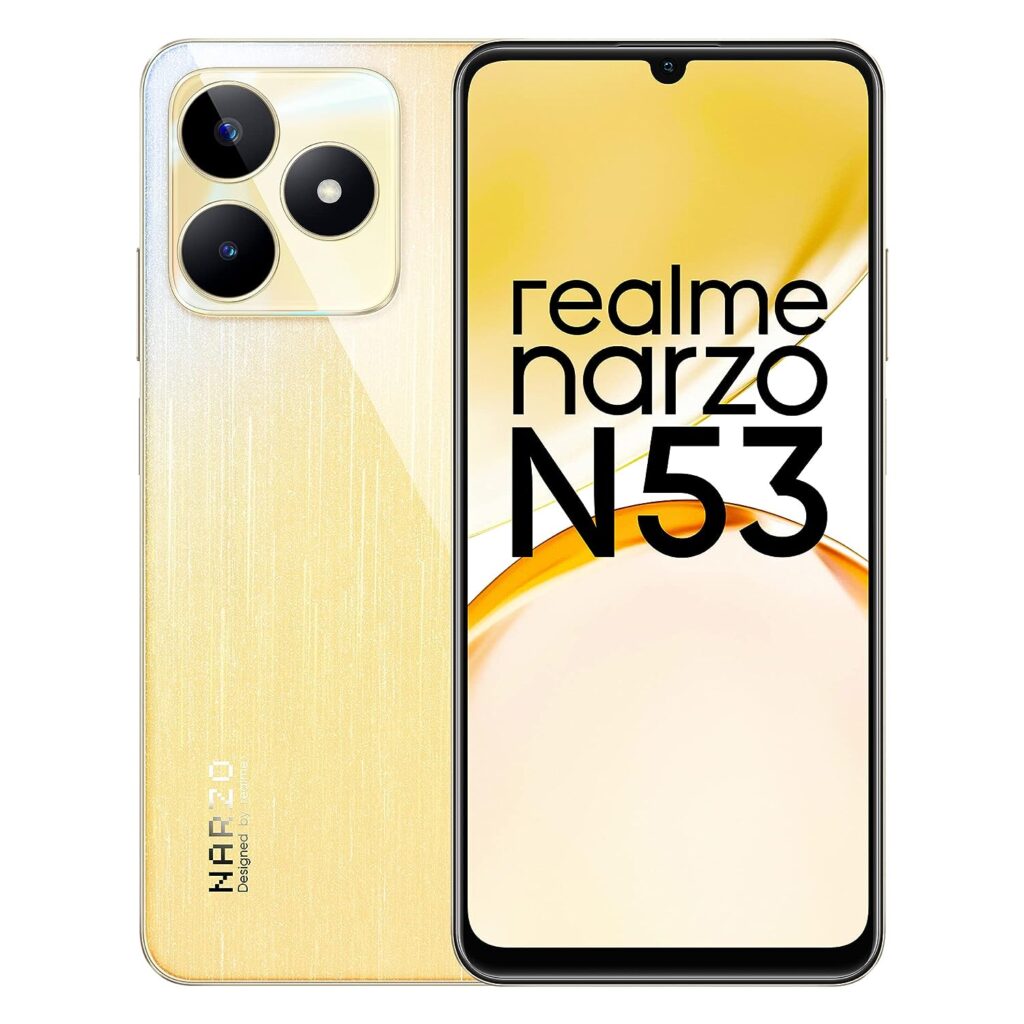
Realme’s Narzo 53 is a worthy addition to the budget smartphone lineup, offering impressive features at an affordable price point. With its 6.6-inch HD+ display, MediaTek Helio G85 chipset, and 4GB of RAM, this device provides a seamless user experience for multitasking and gaming. The triple-camera setup, including a 50MP primary sensor, delivers crisp and vibrant photos, while the massive 6000mAh battery ensures extended usage without the need for frequent charging.
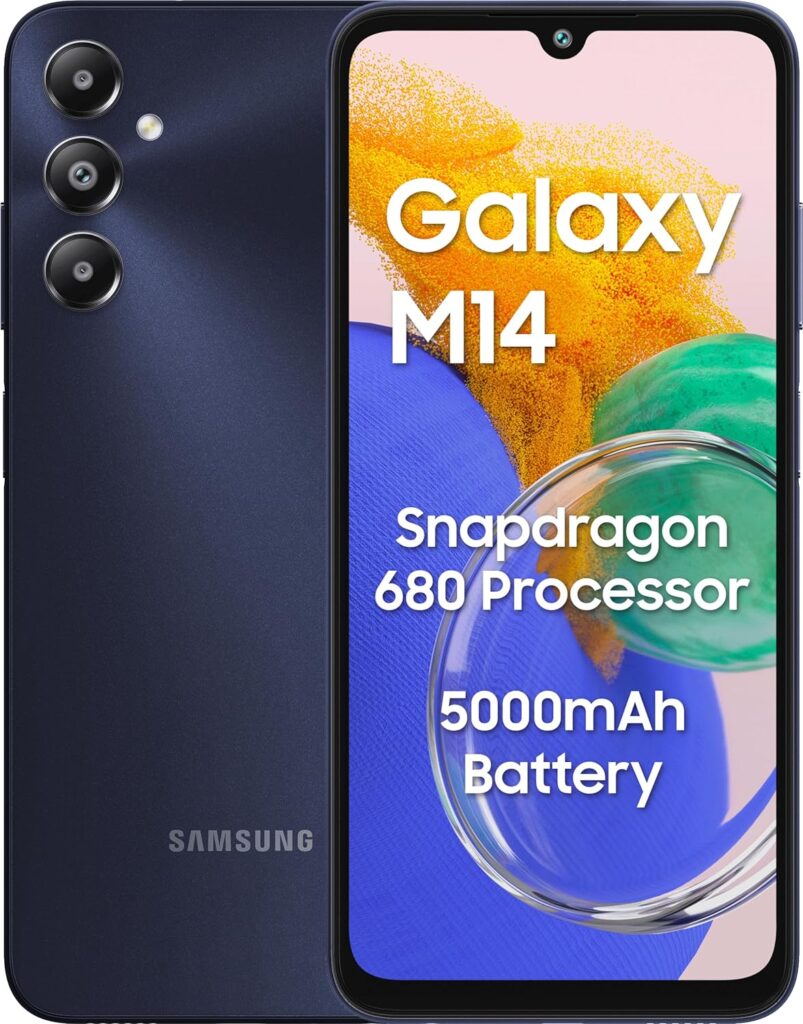
Samsung’s Galaxy M series has garnered a reputation for offering reliable performance at affordable prices, and the Galaxy M14 4G is no exception. Featuring a 6.4-inch Super AMOLED display, Qualcomm Snapdragon processor, and 4GB of RAM, this device provides vibrant visuals and smooth multitasking. Its triple-camera setup, highlighted by a 48MP primary sensor, ensures impressive photo quality, while the 5000mAh battery offers all-day usage without compromise.
Motorola’s G24 Power is a testament to the brand’s commitment to offering solid performance and exceptional battery life. Sporting a 6.5-inch FHD+ display, Qualcomm Snapdragon processor, and 4GB of RAM, this device provides a seamless user experience for various tasks. With its triple-camera setup, featuring a 64MP primary sensor, and a massive 6000mAh battery with 20W fast charging support, the Motorola G24 Power excels in both photography and endurance.
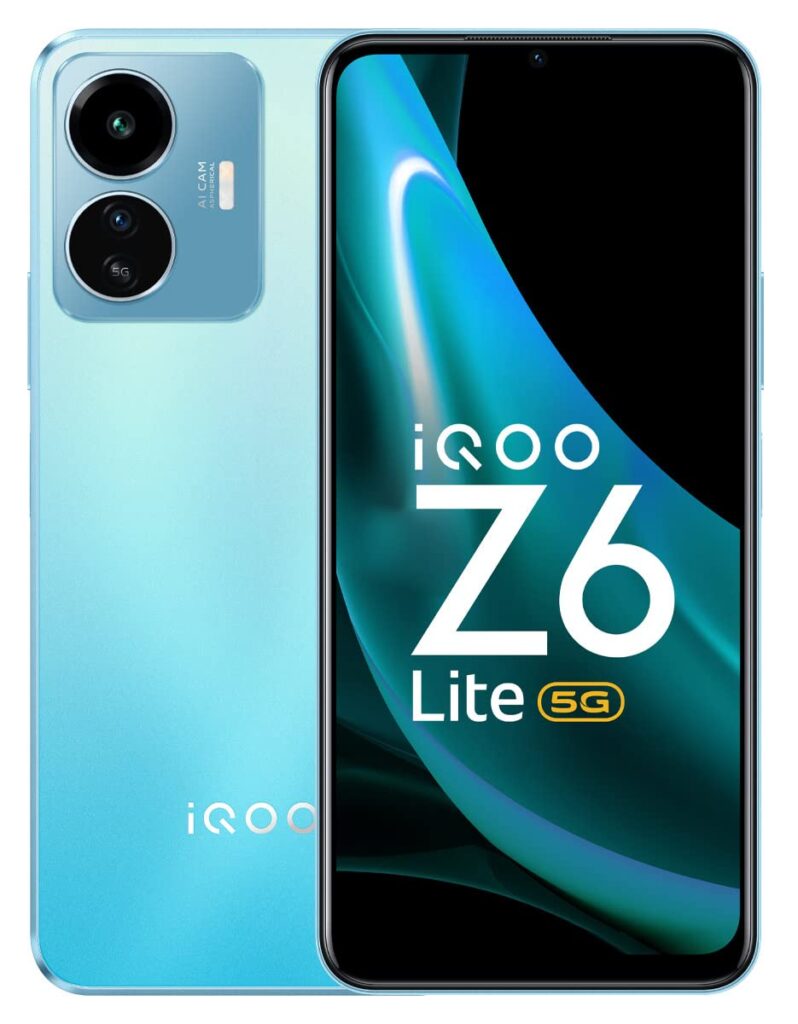
The iQOO Z6 Lite 5G brings 5G connectivity to the budget segment, offering blazing-fast speeds at an affordable price. With a 6.4-inch FHD+ display, Qualcomm Snapdragon 695 chipset, and 4GB of RAM, this device provides smooth performance and immersive visuals. Its triple-camera setup, featuring a 48MP primary sensor, captures detailed photos, while the 5000mAh battery ensures long-lasting usage on a single charge.
Conclusion
In conclusion, the year 2024 has witnessed the launch of several impressive budget smartphones under ₹10,000, offering a perfect blend of performance, features, and affordability. Whether you prioritize camera quality, battery life, or overall user experience, the top 5 smartphones mentioned above cater to a diverse range of preferences, making them worthy contenders in the competitive budget segment.
Disclaimer: This blog post was generated using AI technology.
Most of us are working from home and I know how hard it is to work without a proper workstation setup. Also, working from home without following proper ergonomics could be quite harmful to your overall posture. Finding proper ergonomics equipment could be quite challenging sometimes and with this blog, I would like to recommend every other avid laptop/computer user to switch to an ergonomic mouse to get relief from the pain in the wrist, arms, hands, etc while working for prolonged hours. Also if you’re planning to buy a mouse go with an ergonomic mouse and thank me later!
After doing a lot of research on ergonomics here are my top two recommendations:
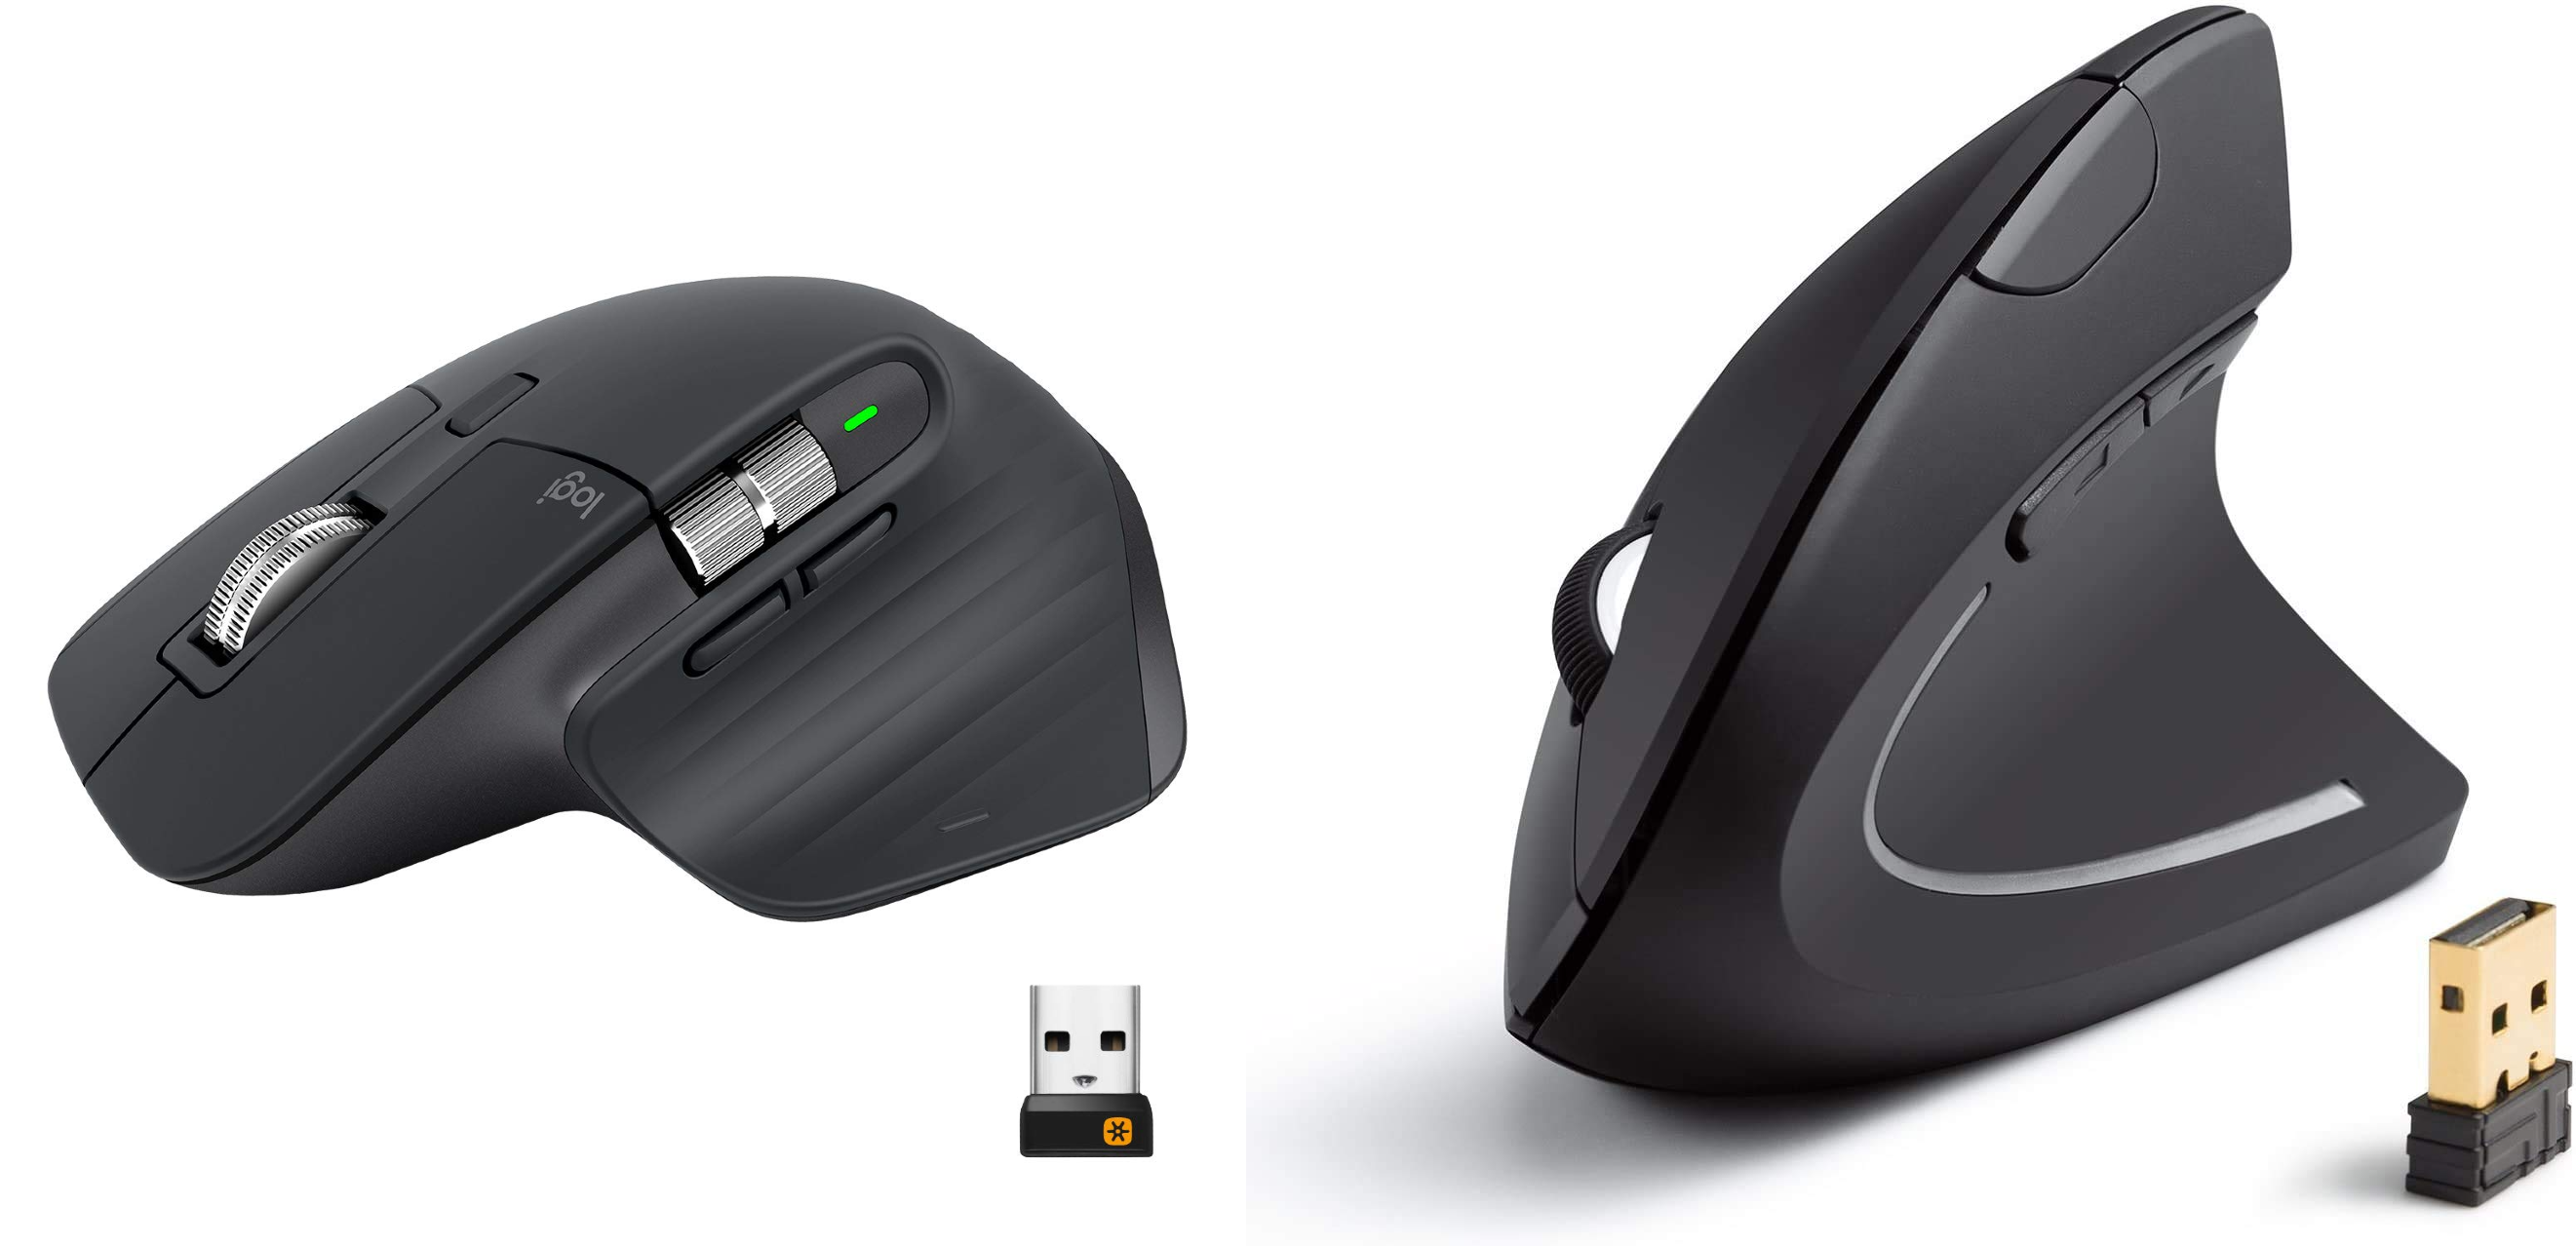
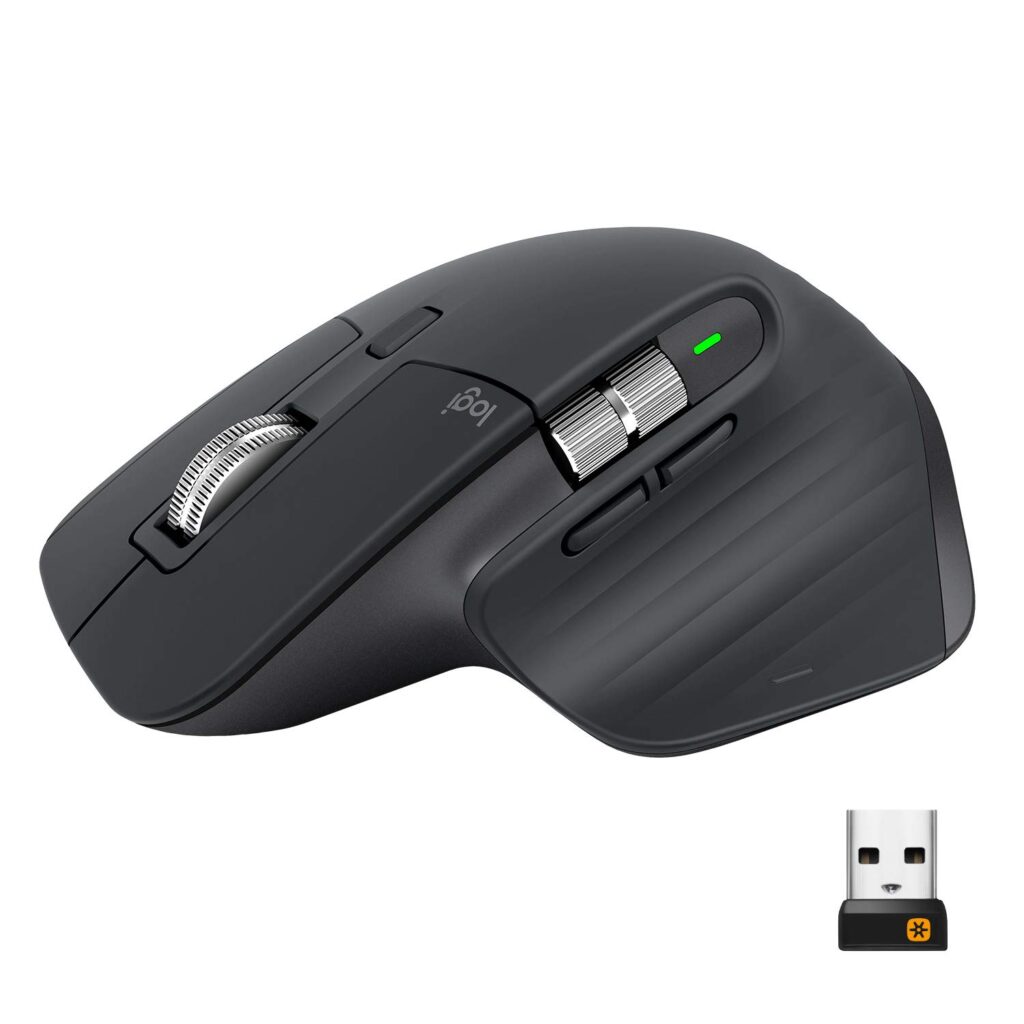
1. Logitech MX Master 3S
No doubt this is one of the best in the market and I understand its price is a little bit on the higher side but let me tell you it’s actually worth it. After doing my research I just ordered this beast today and waiting to receive it by end of the week. I’ll update my review after using it for a month or so.
Some really cool things which I like about this mouse are listed below:
It’s premium built quality.
You can customize every other button to function differently.
You can customize gestures.
It’s extremely comfortable.
Compatible with multiple devices at the same time. You can seamlessly switch between three devices at max at the same time.
USB-C quick charging (after a full charge it can last up to 70 days)
12 months Warranty.
I mean what else do you want? Huh! Just go for it if you work on multiple devices for ~8-9 hours, care about your wrist and ergonomics, and also if you have the budget 🙂
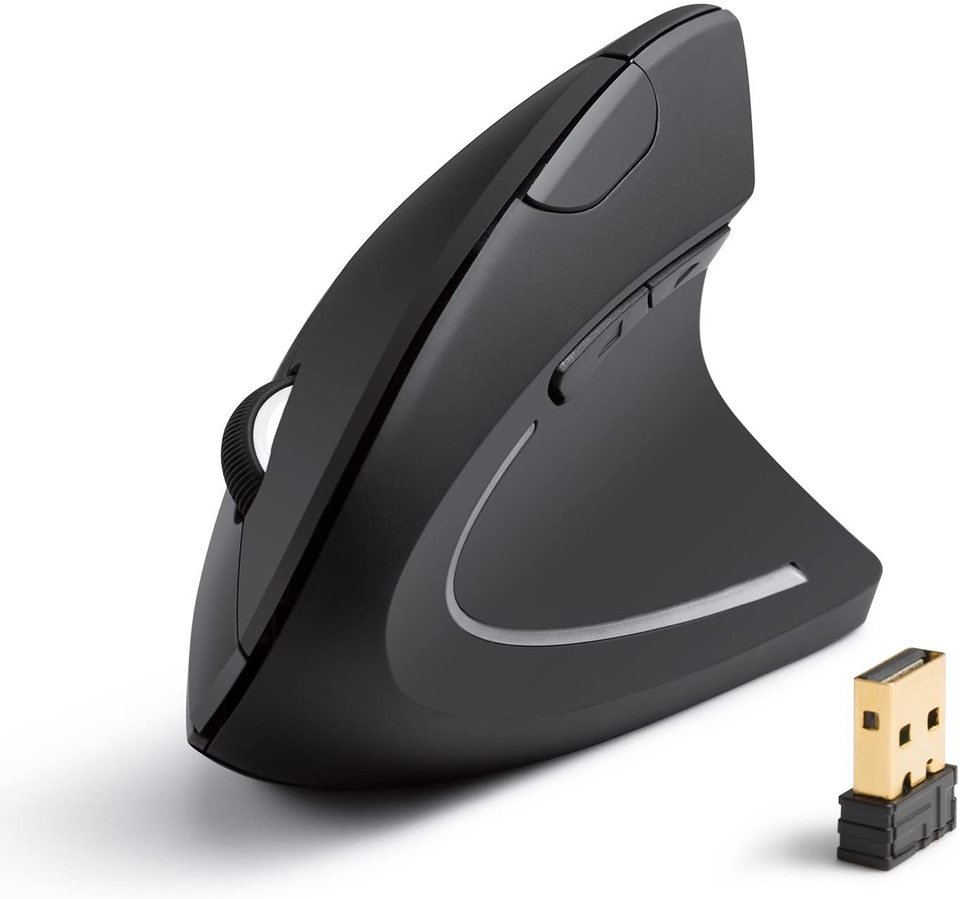
This vertical mouse from Anker is a cheaper option as compared to MX Master 3 but this is as good as MX based on ergonomics. You’ll be relieved of your wrist pain using this mouse. On a sale, in Amazon, you can even get it for as cheap as 2k which is a very reasonable amount for the functionalities you get.
Affordable/Budget-friendly.
Comes with automatic standby.
Non-rechargeable batteries. (2 AAA batteries work for almost ~40 days)
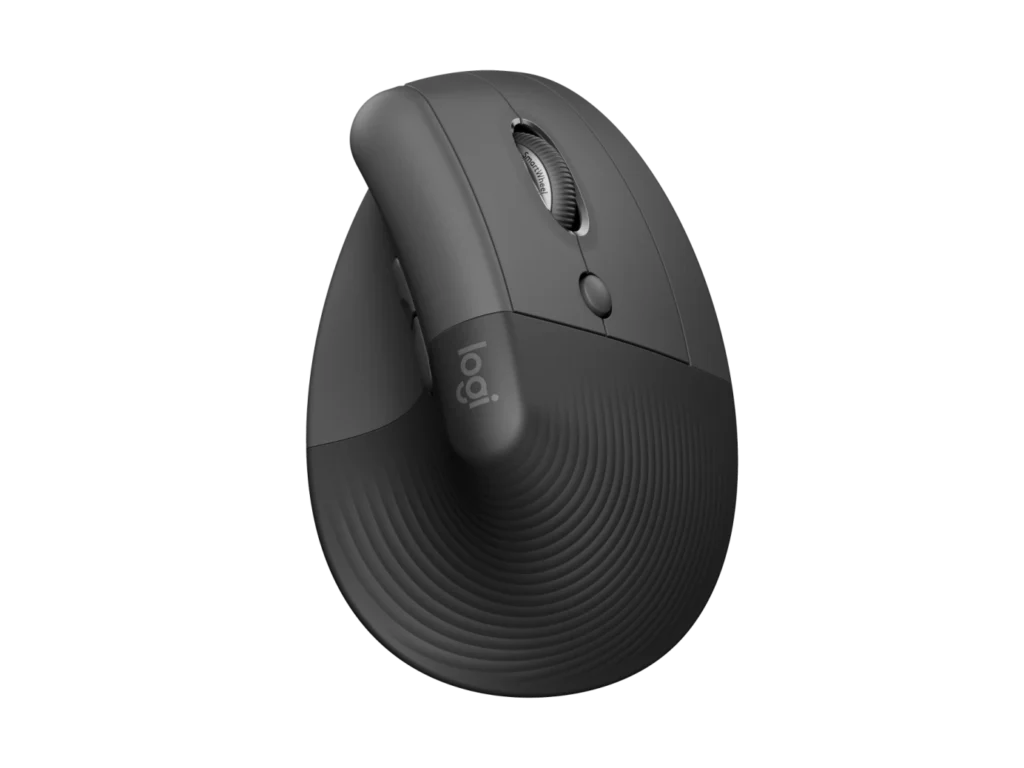
The Logitech Lift vertical mouse is a game-changer, relieving pressure on your wrist and aligning your forearm comfortably with its unconventional design and excellent ergonomics. I like this better than the MX Master 3S due to its unique design. It is a bit cheaper than the MX master 3S as well.
It’s a vertical mouse very comfortable to use.
Similar to MX master 3S, you can customise one of its buttons.
It has a smart wheel with speed and precision control modes.
You can connect this mouse up to 3 devices and switch between devices with a button.
Comes with a 1x AA battery (included) with a battery life of up to 24 months.
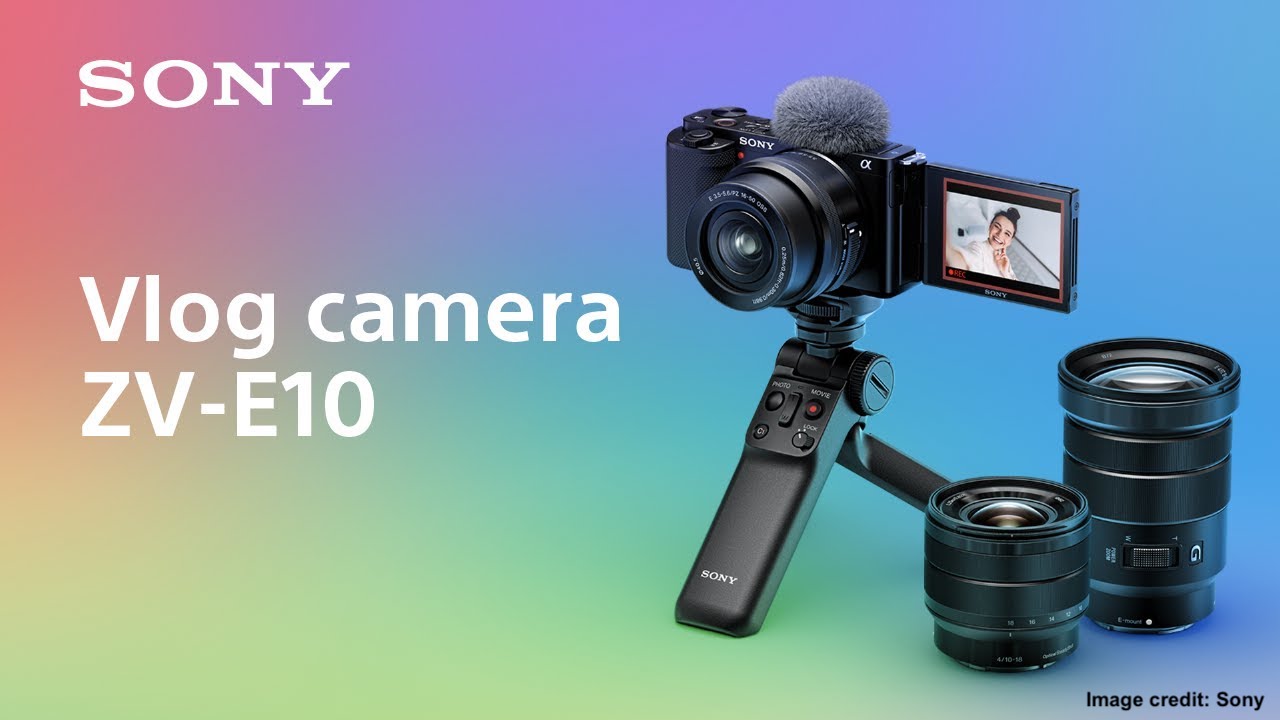
With the holiday season just around the corner, many people are thinking about upgrading their old point-and-shoot cameras to something a little more advanced. If you’re looking for a budget-friendly option that still offers great features and image quality, then the Sony ZV E10 is the perfect camera for you!
The Sony ZV E10 is a great choice for beginner photographers because it offers a wide range of features and good image quality, all at a very affordable price. It’s also very easy to use, so you’ll be able to start taking great photos in no time.
To learn more about the Sony ZV E10, keep reading!
Specs and Key Features
1. 24.2-megapixel APS-C CMOS sensor
2. 4k video recording at 30 fps
3. Vari-angle LCD screen
4. Built-in microphone and headphone jack
5. Compatible with a wide range of Sony E-mount lenses
6. Real-time Eye AF for both humans and animals
7. Fast autofocus and quick shutter speed
8. Easily connect to your smartphone for seamless photo and video transfer
9. Three customizable user modes for easy access to your preferred camera settings
10. Compact and lightweight design, making it easy to take on the go.
Image Quality
The Sony ZV E10’s 24.2-megapixel APS-C CMOS sensor provides excellent image quality with sharp details and vivid colors. It also performs exceptionally well in low-light conditions, thanks to its ISO range of 100-32000. With its ability to shoot 4k video at 30fps, the ZV E10 is perfect for capturing stunning footage for both personal and professional use.
Ease of Use
One of the best things about the Sony ZV E10 is how easy it is to use. With features like real-time Eye AF for humans and animals, fast autofocus, and quick shutter speed, you can capture the perfect shot with confidence. The camera also has three customizable user modes, allowing you to quickly access your preferred camera settings.
Connectivity
The Sony ZV E10 easily connects to your smartphone, making it easy to transfer photos and videos to your preferred device. You can also use your smartphone as a remote control to take photos and videos from a distance. This feature is perfect for taking selfies or group shots when you don’t want to hold the camera.
Overall, the Sony ZV E10 is an excellent camera for beginners and hobbyist photographers who want to upgrade from their point-and-shoot cameras. With its budget-friendly price, excellent image quality, and user-friendly features, the ZV E10 is the perfect tool to capture all your holiday memories.
If you’re looking for a powerful laptop without investing too much money, our list of the top five best laptops in India under 55000 offers great options. With a budget of 55000, you can get a laptop that is powerful enough to handle most tasks and gaming. We have compiled a list of the top 5 laptops you can get in India for under 55000. This list includes laptops from brands like HP, Acer, Lenovo, and Asus. So, if you are looking for a new laptop, make sure to check out this list!
What to look for when choosing a laptop
When looking for the best laptop under 55000, there are a few key features to consider. Firstly, check the processor – the faster the better, meaning higher-end Intel Core processors will give you the best performance. Secondly, check the RAM – having at least 8GB of RAM is recommended to ensure that you can multitask without any issues. Thirdly, look at the display – most laptops will come with Full-HD displays, though paying a bit more may get you a 4K display. Lastly, consider the battery life – a longer-lasting battery will ensure you can use your laptop for a longer period of time.
The top 5 laptops under 55,000 in India
Now that you know what to look for in a laptop, here is a list of the top 5 laptops you can get in India for under 55000. The following laptops offer great performance, plenty of storage, and comfortable ergonomics.
The Lenovo Ideapad 3 is a great laptop for under 55000. It has a 15.6-inch FHD display, an Intel Core i5 processor, and 16GB of RAM. It also has 512GB of storage for all your files, and up to 5 hours of battery life. This also comes with built-in Alexa!
The Asus Vivobook Go 15 (2023) is an excellent device for users seeking a powerful laptop. With a premium 15.6-inch FHD display, AMD Ryzen 5 7520U Mobile processor, 16GB of RAM, and 512GB of storage, this laptop offers impressive performance in a portable package. It also features up to 6 hours of battery life, making it the ideal choice for on-the-go use.
The HP Pavilion 14 laptop offers an impressive performance at an affordable price. It features a 14-inch FHD Micro-Edge display, a Ryzen 5 processor, and 8GB of RAM, allowing you to multitask with ease. Additionally, this laptop boasts 512GB of storage and up to 6.5 hours of battery life, providing plenty of power for everyday tasks.
The Acer Aspire 5 is a suitable laptop for users looking for comprehensive features within a budget of Rupees 55000. This laptop comes with a 15.6-inch FHD display, a 12th Gen Intel Core i5 processor, 16GB RAM, 512GB of storage, and up to 6.5 hours of battery life. It offers good value for money at this price point.
The Dell Inspiron 3520 offers incredible value for its price point. It has a 15.6-inch Full High Definition display, the latest Intel Core i5 processor, 8GB of RAM, and 512GB of storage. On top of that, it provides users with up to 5.5 hours of battery life. The laptop also has exceptional build quality and is ruggedly durable. It’s outfitted with an excellent keyboard and trackpad combination which makes it comfortable to work on and simple to use.
Conclusion
The best laptops in India under 55000 are a great way to get your hands on a powerful machine without spending too much money. Each of these laptops offers great performance and plenty of storage, making them perfect for everyday use. So, make sure to check out our list before you make your purchase!
Disclaimer: This blog post was generated using AI technology.
When it comes to wearable technology, smartwatches are at the top of the list for many people. While there are many different types and brands of smartwatches available on the market today, finding the best one for you can be a challenge. With so many options to choose from, it can be difficult to know where to start.
To help you narrow down your search, we’ve compiled a list of the best smartwatches for 2023. Whether you’re looking for a smartwatch with the latest features or one that’s more budget-friendly, we’ve got you covered.
What to look for in a smartwatch:
When searching for the perfect smartwatch, there are a few important factors to consider. The battery life of the watch, the operating system it runs on, the design, and the features it offers are all important factors. You should think about what type of features you need and choose a watch that meets those needs.
Battery life
The battery life of the watch is an important factor to consider. Most modern smartwatches have batteries that will last for days, but some have batteries that will only last for a few hours.
Operating System
It is also important to consider the operating system it runs on. Most of the popular smartwatches run on either Android Wear or Apple’s watchOS. These operating systems provide access to hundreds of different apps and features.
Design
The design of the watch is another important consideration. Do you prefer a more traditional watch design or would you prefer a modern, touchscreen-based design?
Other features
The features the watch offers are equally important. Most smartwatches offer basic features like step tracking and notifications, but some offer more advanced features like GPS, heart rate monitoring, and music playback. You should think about what features you will use most and look for a watch that has those features.
The Top 5 Smartwatches of 2023:
1. Apple Watch Series 8: The Series 8 is the latest model from Apple and it’s sure to be a hit in 2023. It features a gorgeous OLED display, loads of new health and fitness features, and of course, the ever-popular Apple ecosystem.
2. Samsung Galaxy Watch 5: Samsung’s Galaxy Watch 5 is expected to be one of the most feature-packed smartwatches of 2023. It is likely to feature an even slimmer design than its predecessor, along with a larger battery and improved fitness tracking capabilities.
3. Fitbit Versa 4: The Versa 4 is the successor to the popular Versa 3 and is expected to feature an improved battery life, better fitness tracking capabilities, and even an onboard GPS.
4. Android Wear Pixel: Google’s Android Wear Pixel is expected to be released in 2023 and is likely to feature a sleek design, an updated operating system, and an improved battery life.
5. Garmin Venu 2: Garmin’s Venu 2 Watch is released in 2023 and it has a new sleek design, very good battery life, and loads of new features.
Conclusion:
Smartwatches are becoming more popular every year and 2023 is no exception. These five smartwatches are sure to be the best of the best when it is released and any one of them would make a great addition to your collection. Be sure to consider your needs and budget when looking for a new smartwatch and you’ll be sure to find the perfect one for you. Thanks for reading and happy shopping!
Disclaimer: This blog post was generated using AI technology.
This post will talk about the best wireless headphones available to order in India under 2000. I have listed down 4 such headphones all with some pros and cons.
1. OnePlus Bullets Wireless Z
There are two variants to it first one is the BMZ version and the second one is the BWZ-Bass Edition. The BMZ-Bass Edition has better bass than the BMZ version but it has less playtime by 3 hours. BMZ-Bass Edition version is good for people who love extra Bass and the regular BMZ version is good for extended calls as it has 20 hours of playtime. If you have a OnePlus smartphone that supports Dolby Atmos (7/7 Pro/7T/7T Pro/8/8 Pro devices) you can even enable that feature to get better sound output from the headphones.
Battery life ~17/20 hours | Fast charging wrap | Passive noise cancellation | USB Type-C | IP55 (Sweat and water-resistant) | Magnetic Control| Bluetooth version: 5.0
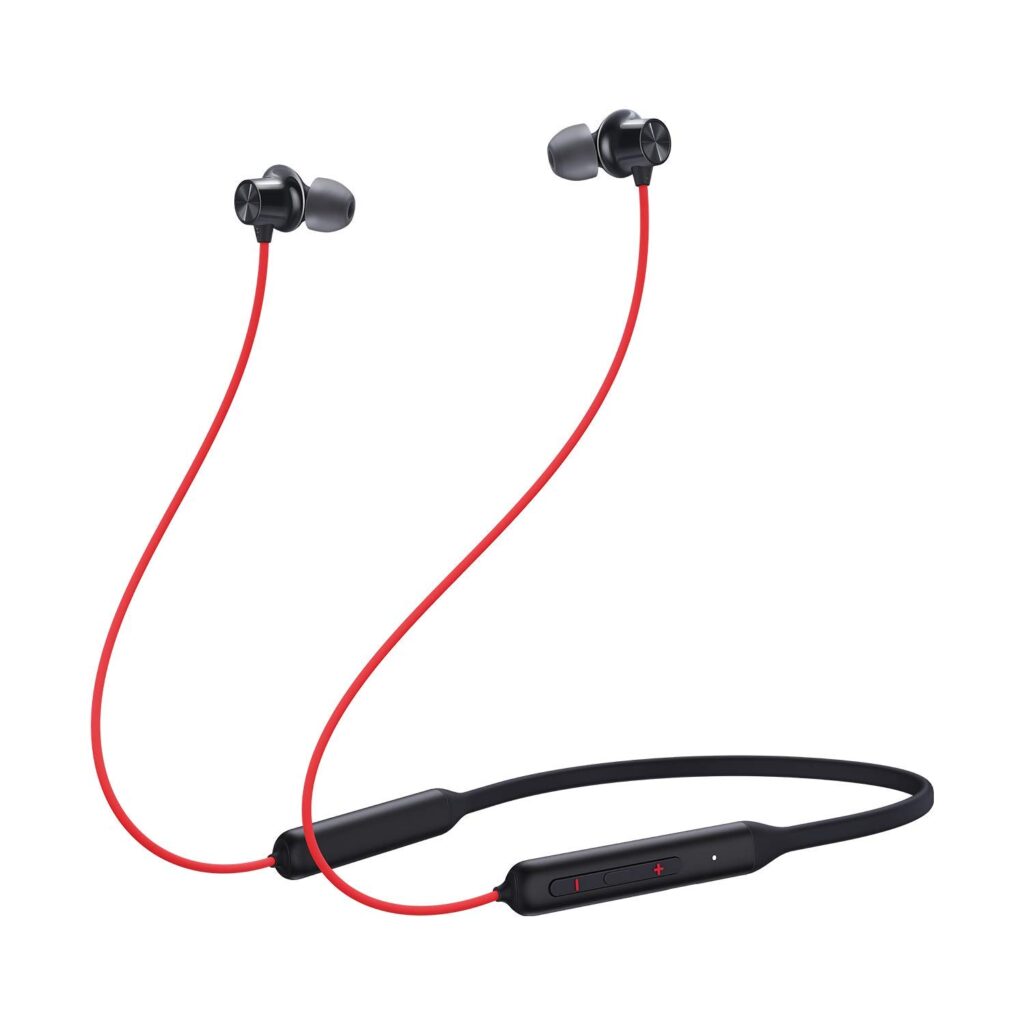
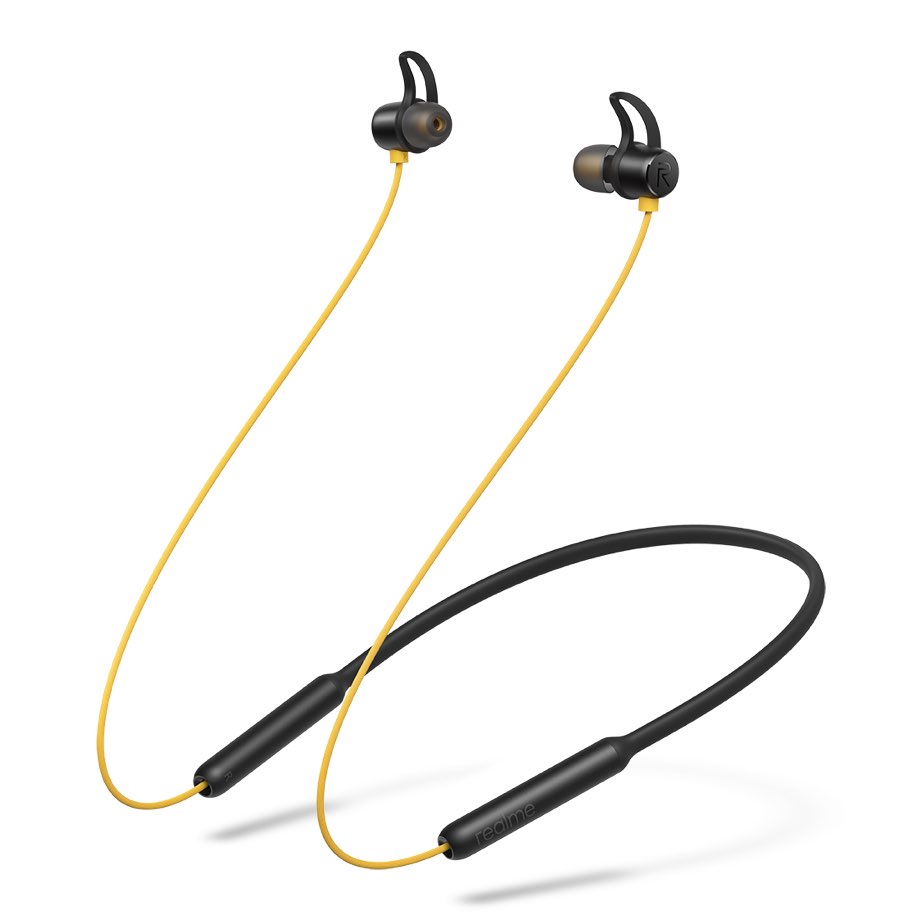
These in-ear bluetooth earphones from Realme are the cheaper options as compared to one plus in the list. If you like a bit of bass boost then these headphones are for you. It comes with a battery life of 12 hours which is less than OnePlus Bullets Wireless Z but its bass is a bit on the higher side as compared to OnePlus Bullets Wireless Z.
Battery life ~12 hours | Fast charging | Bass Boost | Micro USB | quick Magnetic Control | Bluetooth version: 5.0
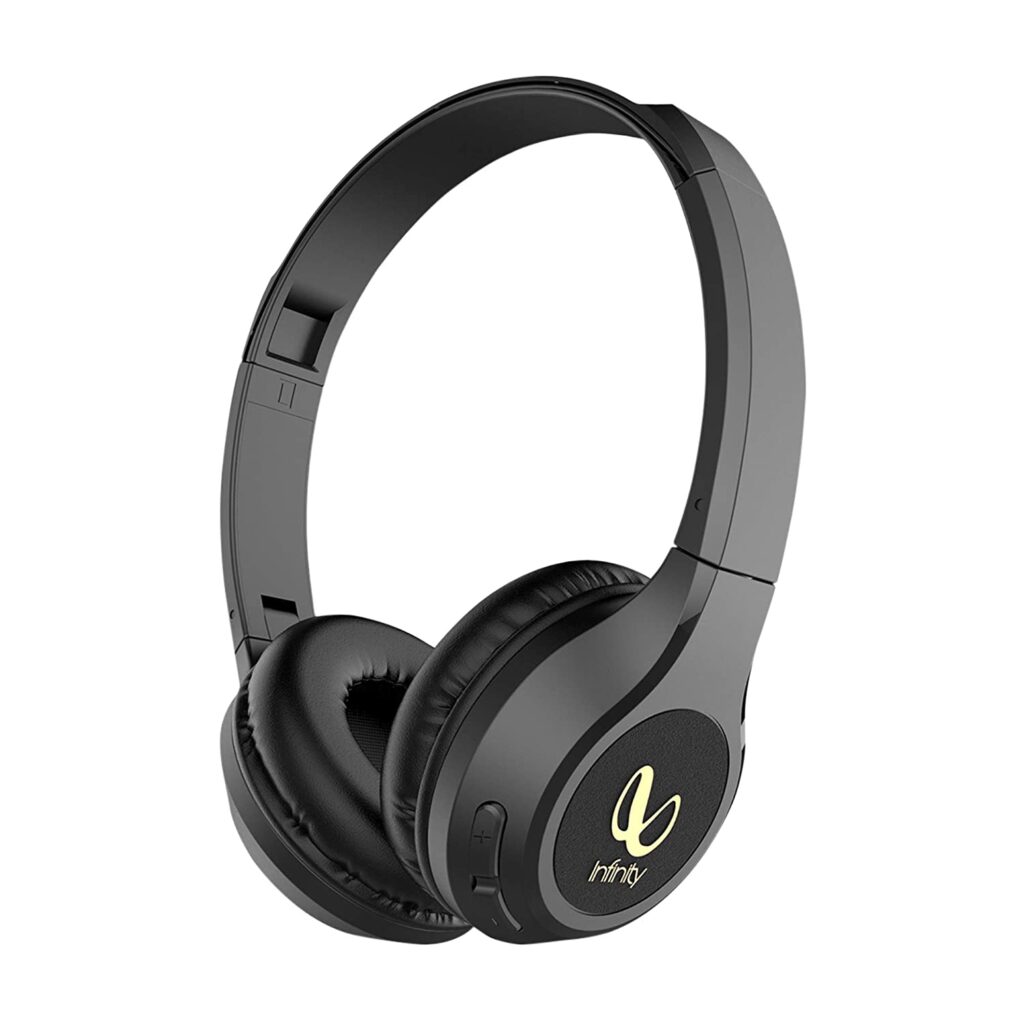
This is our very first on-the-ear headphones on the list. These headphones come with decent sound quality with Dual Equaliser Modes for Normal & Deep Bass Output and with quick charging. If you’re looking for lightweight wireless on-the-ear headphones that can be used for long hours then you can go for it.
Battery life ~20 hours | Quick charging ~2 hours | Lightweight | Dual Equaliser | Deep bass | No active noise cancellation | No 3.5 mm cable
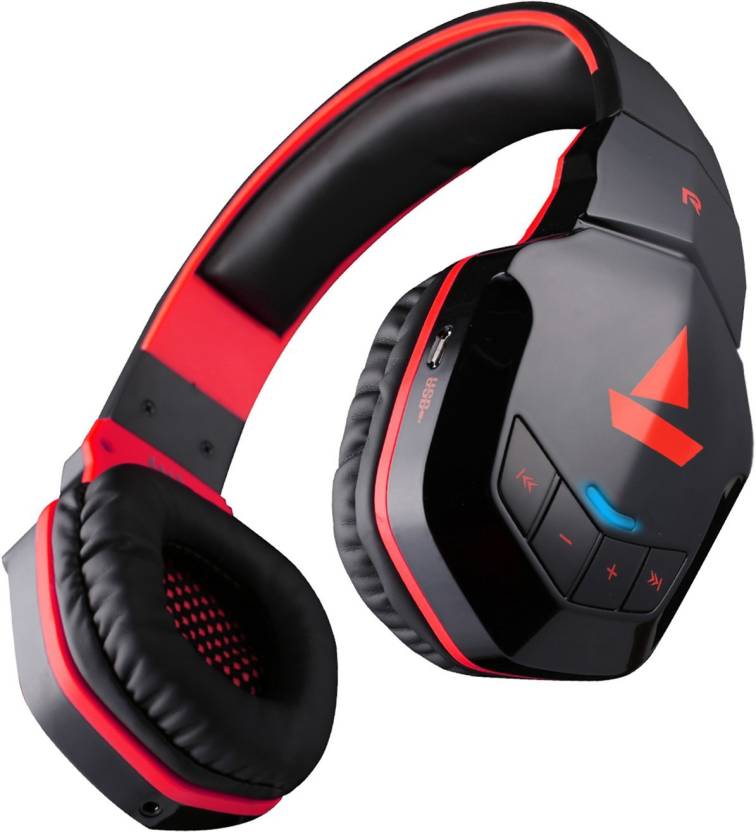
These stylish-looking on-the-ear headphones by boAt come with very powerful bass and very good sound quality. Its playtime is of about 20 hours. It’s quite comfortable to wear for long hours while coding or playing games.
Battery life ~20 hours | Stylish looks | Comfortable | Thumping bass | No active noise cancellation | 3.5 mm cable
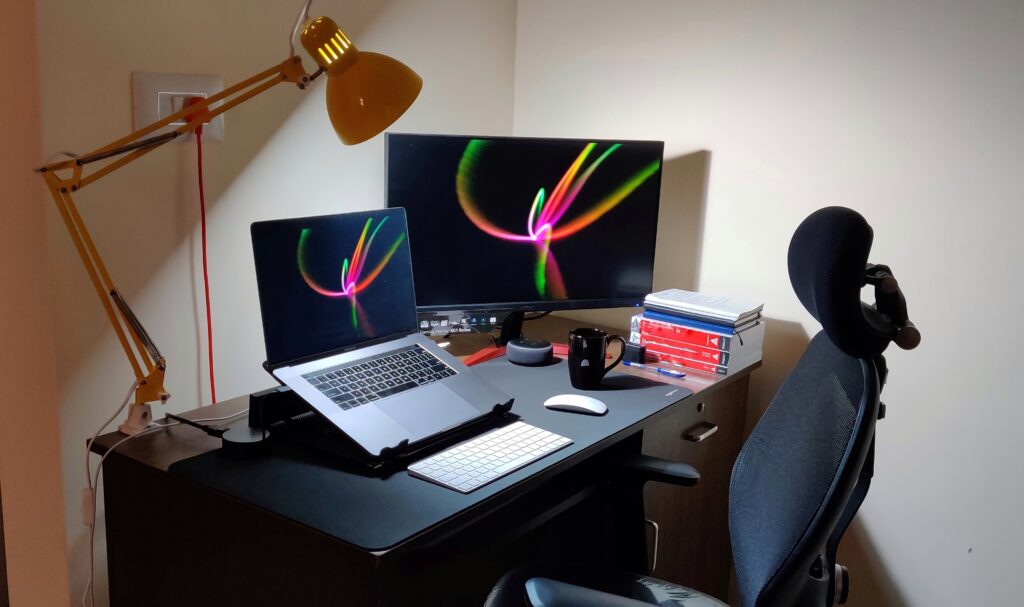
While I was setting up my work from setup I was looking for a monitor that fits in the budget, is sturdy, and meets all the following specification:
The display size should be greater than 24 inches.
Full HD 1920 x 1080 Resolution or better.
The refresh rate should be better than 70 Hz (I play PC games)
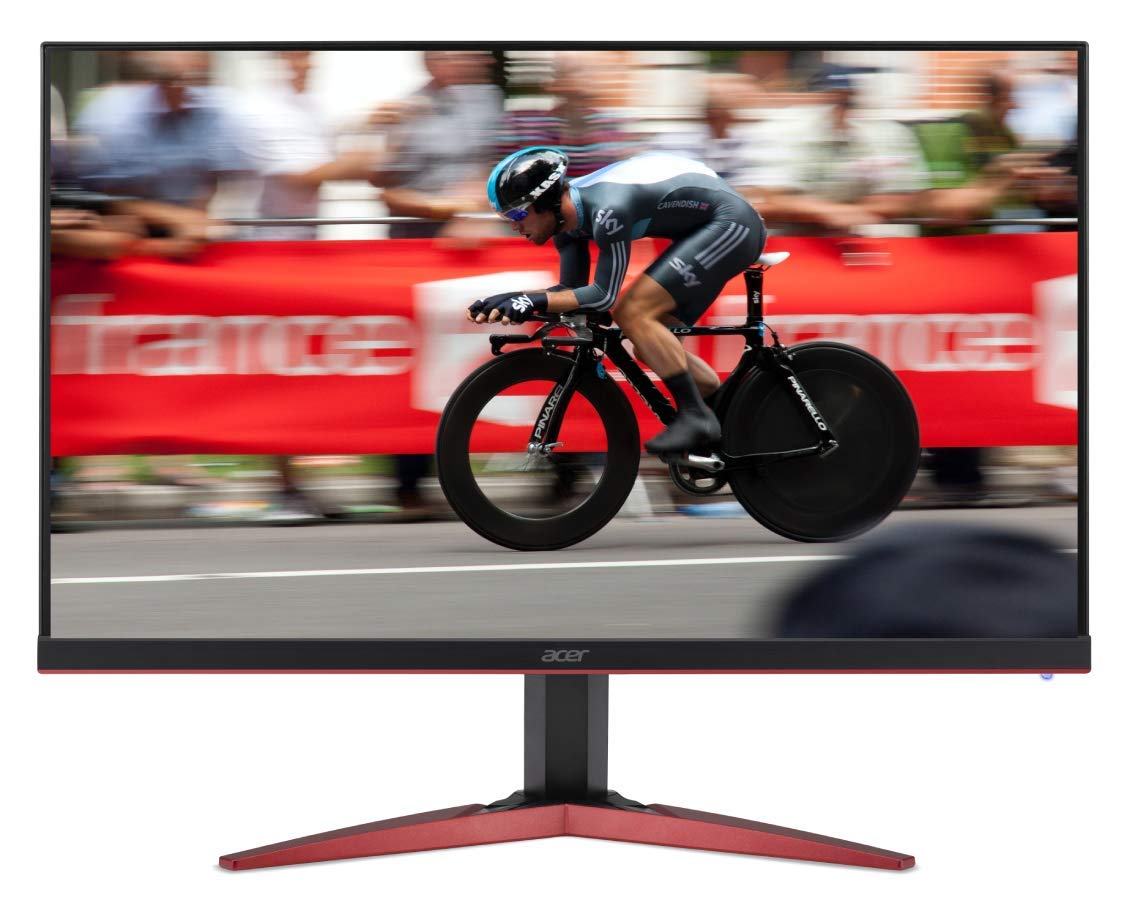
My search ended up with buying the Acer 27-inch KG271 Cbmidpx:
This monitor comes with a 144 Hz Refresh Rate, 27 inch Full HD 1920 x 1080 Resolution with Display Port and HDMI cables included and I got it for a very good deal from Amazon (16k).
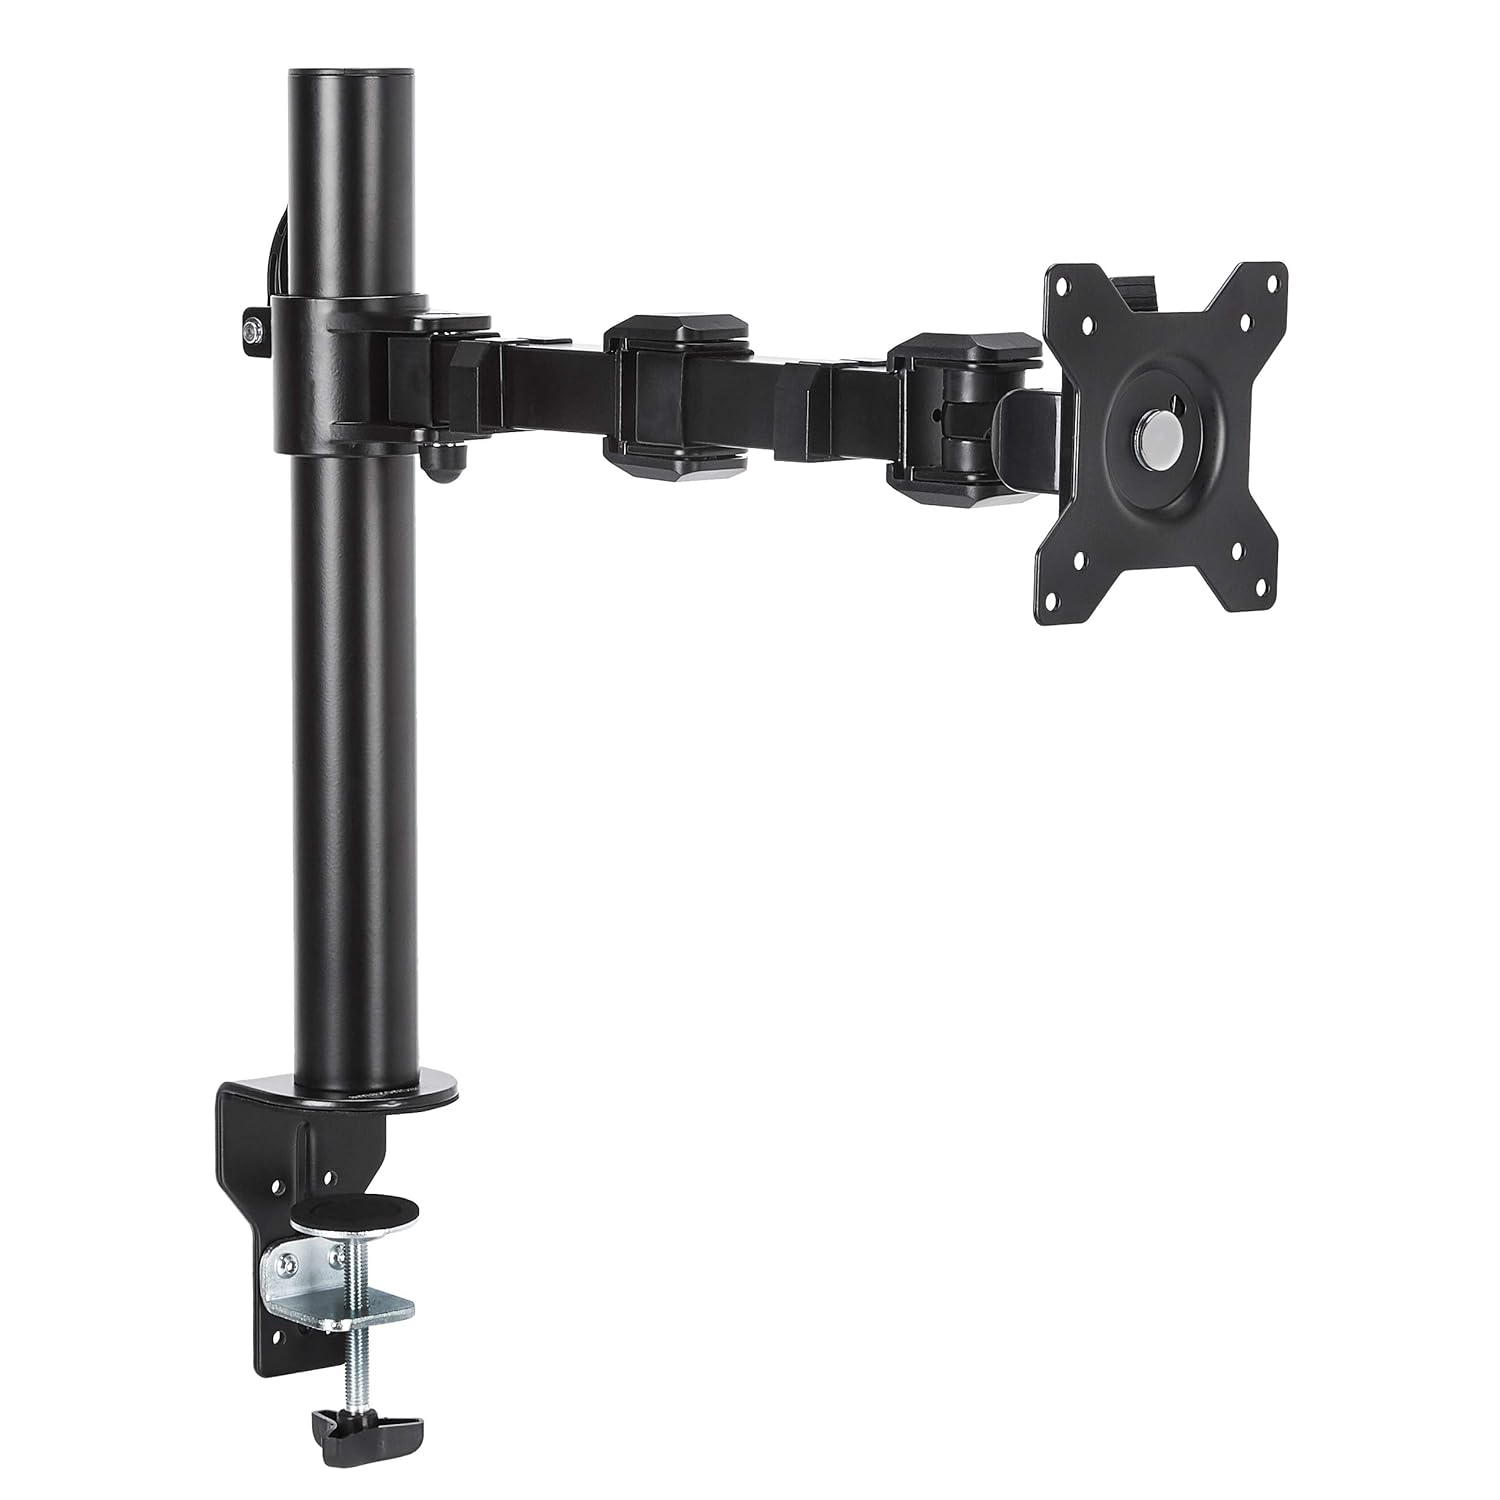
One cool thing about this monitor is it can be mounted on a wall or a table and for that one can buy a Height Adjustable Arm Mount which can be affixed with the table or wall so that one can move/rotate the monitor freely.
In my case I bought a Monitor arm which can be affixed with the table and my search ended up with buying the AmazonBasics Monitor Stand, Height Adjustable Arm Mount- Steel:
This is how my current work from home setup looks like:
I did a fair amount of research on ergonomics before ordering the chair and it works in my case i.e. I did not feel any back pain while sitting on it for hours 🙂
I’m using a MacBook pro which only has USB-c ports and in order to connect my MacBook to the monitor instead of buying an expensive dock, I bought one handy USB-C adapter which has a display and HDMI port to connect to the monitor.
I hope this helps somebody looking to set their work from home setup and using a MacBook. Cheers!
Modern Data platforms consider using a data lake over a data warehouse for their storage requirements. However, a data lake lacks in providing support for business intelligence use cases and often organizations end up having a separate data warehouse for their business intelligence use case and operational users. This article explains the different paradigms organizations follow and how Lakehouse solves the problems of both the worlds.
Let’s first start with the difference between a Data lake and a Data warehouse.
Data Lake v/s Data Warehouse
Let me explain the difference using a simple analogy:
Think of a data warehouse as a store of packaged drinking water and data lake as a body of natural drinking water.
The packaged drinking water is directly consumable because the water has been cleaned/filtered and packaged. But in order to consume water from a lake, you have to process/filter it before you can use it. Also, only users who know how to open a bottle will be able to consume water from the bottle. But in the case of the lake even animals can consume water from it. Water in the lake is in its rawest form whereas water in the packaged bottles is processed.
Water in the lake can be used for a variety of different purposes but nobody uses bottled water for cleaning the car and irrigation etc. Bottled water is used to drink most of the time.
The above points clarify a few things:
Drinking water from bottled water requires some expertise or in other words consuming data from a data warehouse requires some expertise and is meant for a few users, implying that the user base of a data warehouse is limited. In the case of a lake, anybody can consume water from it after doing their own filtration. Similarly, data lake has a vast user base and is not limited to a few users.
The usage of bottled water is pre-decided (most of the time it will be used for drinking) but the usage of lake water depends on its user. This implies that the purpose of lake water is decided as and when somebody wants to consume water from it whereas a lot of pre-processing has already been done to design the data warehouse. This ties to the distinction between schema on write vs schema on read approach followed by data warehouse and data lake respectively.
The bottled water is preprocessed but water in a lake requires some cleaning before it becomes consumable and the onus is on individual users to clean it.
Water in the bottle is confined to some structure whereas water in the lake is in different formats and might be coming from a variety of streams as well. This implies that data lake supports all data types whereas data warehouse only supports structured data.
Now you might be thinking with all the points mentioned above that data lake is the way to go as it supports all types of data: structured, semistructured, and unstructured along with a vast majority of users whereas Data warehouses only support structured information and have a small user base.
While data lake is good for data science and machine learning use cases as it provides all sorts of data for deep analysis, it misses out on the operational use case cases where the data should be well structured to get the key metrics and reports.
And what if you want to derive some business intelligence from the data in your data lake? You probably will load the data from the data lake into any data warehouse for the business intelligence use case. And a lot of organizations do that, but in that case, they end up managing two different siloed storage systems: one for BI use cases and another for use cases such as Data Science, Machine Learning, etc.
Data Lake and Data Warehouse
New modern organizations have data management platforms which combine both data lake and data warehouse in a single entity by performing ETL/ELT on the raw data of data lake and define some structures on it.
So far all good no need to maintain two separate storage entities and now your data warehouse sits inside your data lake which acts as a landing place to ingest raw data. A data warehouse is the portion of the data lake where we enrich and structure the data so that it can be queried directly.
This paradigm copes up with the challenges of having two separate storage systems but we still need to maintain the ETL/ELT layer.
Data Lake + Data Warehouse = Data Lakehouse
But wait there is another paradigm known as Data Lakehouse that is trending nowadays and is bringing the best of both paradigms (Data Lake and Data Warehouse). In simple words, Data Lakehouse enables you to perform queries for BI/reports use cases directly on the data stored in the data lake without having to load it in a separate data warehouse. The processing/structural layer is responsible for making that happen.
This approach saves a lot of operational costs as you don’t have to manage two storage systems simultaneously. It also eliminates the ETL/ELT layer which transforms data from the data lake and loads in the data warehouse as you can now directly have your query engine querying data directly from the lake.
This paradigm helps organizations to move faster and make better decisions.
The processing or structured layer could be AWS Athena, Delta lake, etc. I personally like Delta lake for this kind of functionality as it provides ACID transactions on top of your data lake which enables you to perform some business-critical actions like GDPR DSR requests etc.
Final thoughts: Deciding on which paradigm to use should be a conscious decision and it mostly depends on your use case and how your organization operates.
This post will guide you to create a simple web application using Spring Boot and Apache Kafka.
Apache Kafka is a distributed streaming platform which is well known for moving data between systems in a distributed way.
Spring boot provides out of the box integration with Apache Kafka so that you don’t have to write a lot of boiler plate code to integrate Kafka in your web application.
Let’s get started!
Prerequisites
The only prerequisite is to have Kafka up and running in your environment. And to do that follow the links based on what operating system you’re using:
I generally prefer running all my system dependencies using docker which is an awesome tool for developers. Docker enables developers to focus on writing code and not worry about the system it will run on. If you want to run Kafka using docker, you can use thedocker-compose.yamlfile that I have added in the github repo. So before running the application just copy the file and perform a docker-compose up -d which will spin up a single Kafka broker, Zookeeper and will also create the required topic. This means you don’t need to perform step 6.
Steps to create Spring Boot + Apache Kafka web application:
Follow the below steps to create a Spring Boot application with which you can produce and consume messages from Kafka using a Rest client.
1) Creating the Web Application Template:
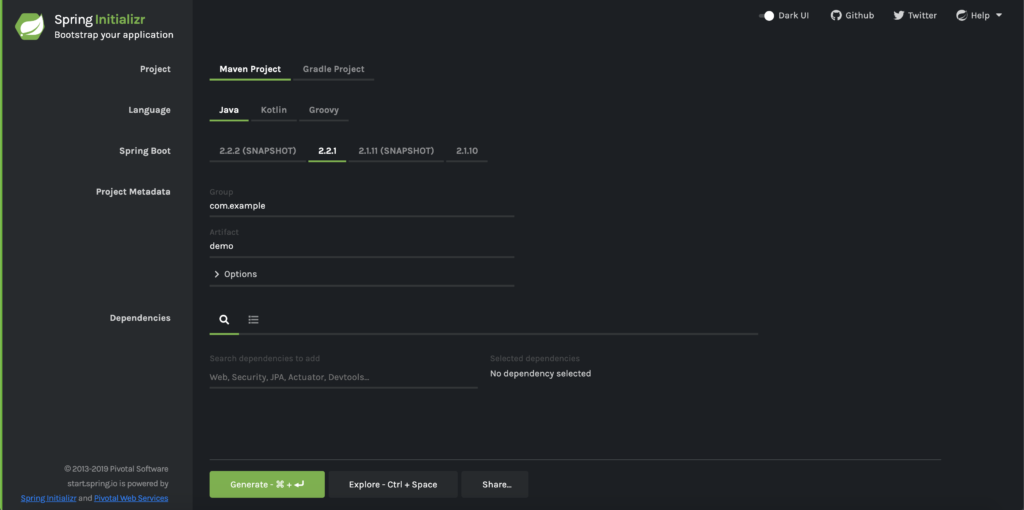
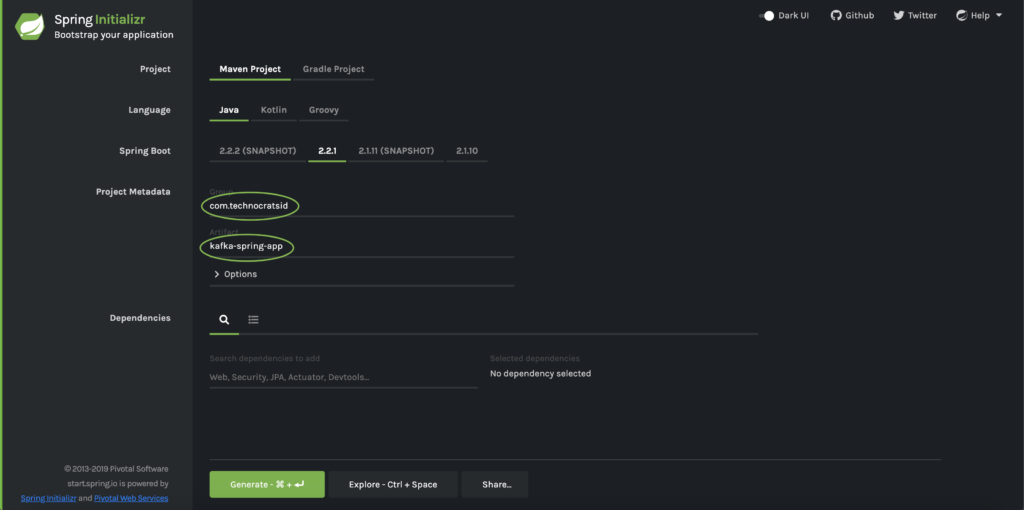
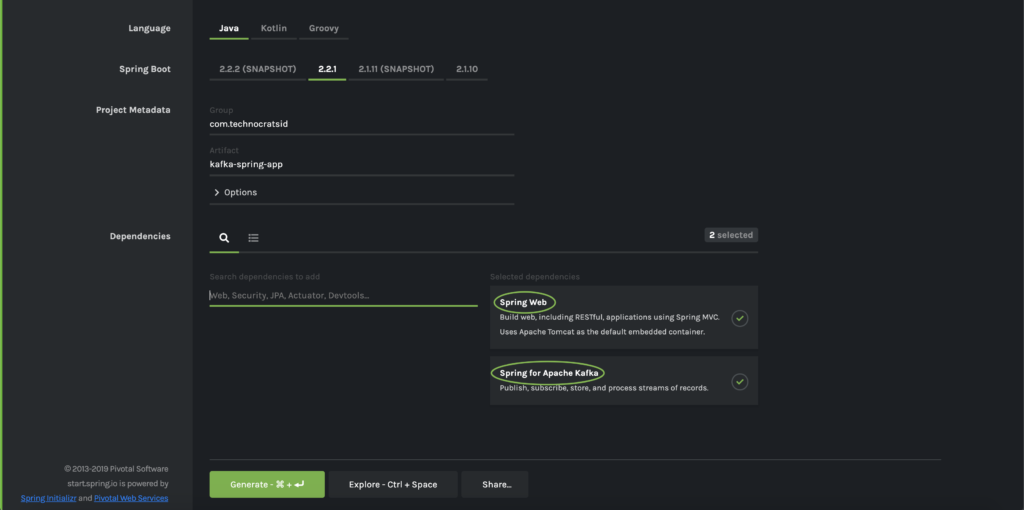
We’ll be using Spring Initializr to create the web application project structure and the easiest way to use Spring Initializr is to use its web interface.
1.3) Add Spring Web & Spring for Apache Kafka dependencies:
Then, click on Generate Project.
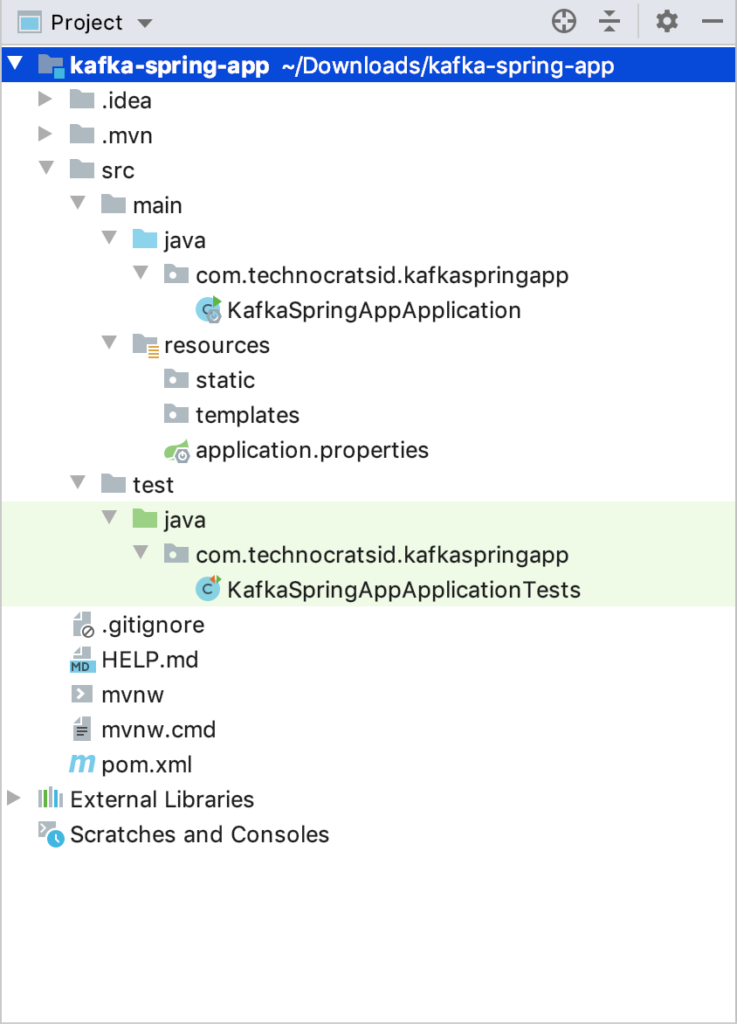
This will generate and download the kafka-spring-app.zip file which is your maven project structure.
1.4) Unzip the file and then import it in your favourite IDE.
After importing the project in your IDE (Intellij in my case), you’ll see a project structure like this:
2) Configure Kafka Producer and Consumer:
We can configure the Kafka producer and consumer either by creating configuration classes (annotating classes with @Configuration annotation) for both producer and consumer or by using application.properties/application.yml file to configure them. In this tutorial, I’ll be demonstrating both for integrity. I personally prefer the latter approach (application.properties/application.yml) as it is quite handy and doesn’t require all the boilerplate code of the configuration class and that’s the beauty of spring boot one should leverage.
2.1) Creating configuration classes for Kafka consumer and producer:
Creating the consumer config class:
Create a class ConsumerConfig.java in package com.technocratsid.kafkaspringapp.config with the following content:
Note: Here we are declaring ConsumerFactory and ConcurrentKafkaListenerContainerFactory as beans (using @Bean annotation). This tells the spring container to manage them for us. ConsumerFactory is used to specify the strategy to create a Consumer instance(s) and ConcurrentKafkaListenerContainerFactory is used to create and configure containers for @KafkaListener annotated methods.
@Configuration is used to tell Spring that this is a Java-based configuration file and contains the bean definitions.
@EnableKafka annotation tells Spring that we want to talk to Kafka and allows Spring to detect the methods that are annotated with @KafkaListener.
@Value annotation is used to inject value from a properties file based on the property name.
The application.properties file for properties spring.kafka.bootstrap-servers and spring.kafka.groupId is inside src/main/resources and contains the following key value pairs:
If you wish to run the application with a remote Kafka cluster then edit spring.kafka.bootstrap-servers pointing to your remote brokers.
Creating the producer config class:
Create another class ProducerConfig.java in the same package com.technocratsid.kafkaspringapp.config with the following content:
package com.technocratsid.kafkaspringapp.config;

import java.util.HashMap;
import java.util.Map;

import org.apache.kafka.common.serialization.StringSerializer;
import org.springframework.beans.factory.annotation.Value;
import org.springframework.context.annotation.Bean;
import org.springframework.context.annotation.Configuration;
import org.springframework.kafka.core.DefaultKafkaProducerFactory;
import org.springframework.kafka.core.KafkaTemplate;
import org.springframework.kafka.core.ProducerFactory;

@Configuration
public class ProducerConfig {

    @Value("${spring.kafka.bootstrap-servers}")
    private String kafkaServers;

    @Bean
    public ProducerFactory<String, String> getProducer() {
        Map<String, Object> configProp = new HashMap<>();
        configProp.put(org.apache.kafka.clients.producer.ProducerConfig.BOOTSTRAP_SERVERS_CONFIG, kafkaServers);
        configProp.put(org.apache.kafka.clients.producer.ProducerConfig.KEY_SERIALIZER_CLASS_CONFIG, StringSerializer.class);
        configProp.put(org.apache.kafka.clients.producer.ProducerConfig.VALUE_SERIALIZER_CLASS_CONFIG, StringSerializer.class);
        return new DefaultKafkaProducerFactory<>(configProp);
    }

    @Bean
    public KafkaTemplate<String, String> kafkaTemplate() {
        return new KafkaTemplate<>(getProducer());
    }

}
Note: Here we are declaring ProducerFactory and KafkaTemplate as beans where ProducerFactory is used to specify the strategy to create a Producer instance(s) and KafkaTemplate is a template for executing high-level operations like sending messages to a Kafka topic etc.
The value of kafkaServers is injected from the property spring.kafka.bootstrap-servers of the application.properties file same as ConsumerConfig class.
2.2) Configuring the Kafka consumer and producer using application.properties:
Open the application.properties file inside src/main/resources and add the following key value pairs:
The above properties will configure the Kafka consumer and producer without having to write a single line of code and that’s the beauty of spring boot.
The key value pair in application.properties (allows to specify configuration) allows spring to do different things. With this file you can tell spring to configure things without writing any code.
3) Creating a consumer service:
Create a class KafkaConsumer.java in package com.technocratsid.kafkaspringapp.service with the following content:
package com.technocratsid.kafkaspringapp.service;

import org.springframework.kafka.annotation.KafkaListener;
import org.springframework.stereotype.Service;

import java.util.ArrayList;
import java.util.List;

@Service
public class KafkaConsumer {

    public static List<String> messages = new ArrayList<>();
    private final static String topic = "technocratsid-kafka-spring";
    private final static String groupId = "kafka-spring-app";

    @KafkaListener(topics = topic, groupId = groupId)
    public void listen(String message) {
        messages.add(message);
    }
}
@KafkaListener allows a method to listen/subscribe to specified topics.
In our case whenever a message is produced on the topic “technocratsid-kafka-spring“, we are adding that message to a List of String (which is adding stuff to memory and it is not a good practice, in real world you might consider writing the messages to some datastore) so that we can display the messages later.
@Service tells Spring that this file performs a business service.
4) Creating a producer service:
Create a class KafkaProducer.java in package com.technocratsid.kafkaspringapp.service with the following content:
Here we are using the KafkaTemplate send method to send messages to a particular topic.
@Autowired tells Spring to automatically wire or inject the value of variable from the beans which are managed by the the spring container. So in our case the value of kafkaTemplate is injected from the bean kafkaTemplate() defined in ProducerConfig class.
@Service tells Spring that this file performs a business service.
5) Creating a rest controller:
Create a class KafkaController.java in package com.technocratsid.kafkaspringapp.controller with the following content:
This class registers two endpoints /send and /receive which sends and receive messages to and from Kafka respectively, where /send is a POST request with String body and /receive returns the sent messages.
6) Create the required Kafka topic:
Before running the application create the following topic:
Either run the KafkaSpringAppApplication class as a Java Application from your IDE or use the following command:
mvn spring-boot:run
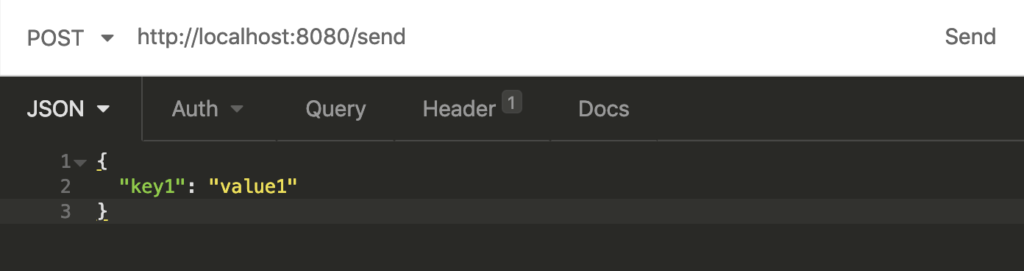
8) Testing the web app with a REST client:
To test the Spring Boot + Apache Kafka web application I am using Insomnia REST Client which is my favourite Rest client because of its simple interface. You can use any REST client.
Once your application is up and running, perform a POST request to the URL http://localhost:8080/send with the body {“key1”: “value1”}:
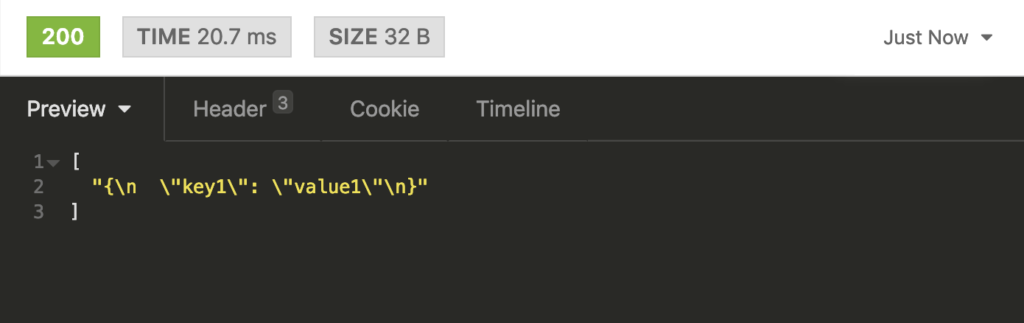
Then, perform a GET request to the URL http://localhost:8080/receive and this is the response you’ll get:
Congratulations on building a Spring Boot + Apache Kafka web application.
Hack into the github repo to see the complete code.
This post is a step-by-step guide to install and run Apache Kafka on Windows.
Prerequisite
The only prerequisite for this setup is JRE.
Install Java (Skip if you already have it)
Download Java 8 from here. (Java 8 is recommended by Apache Kafka)
Run the installer and follow the instructions on Installation wizard.
Please note/copy the Destination Folder location.
Go to Control Panel -> System -> Advanced system settings -> Environment Variables.
Create a new user variable named JAVA_HOME and paste the path copied from step 3 to the variable value and click OK.
Now edit PATH variable in User variables and add “%JAVA_HOME%\bin” at the end of the variable value. If it’s an older windows version, then add “;%JAVA_HOME%\bin;” at the end of the text. If PATH variable doesn’t exist create it with the value “%JAVA_HOME%\bin”.
Open command prompt and type “java -version” to validate the installation.
If you get the following output in your command prompt you’re good to go:
java version "1.8.0_231"
Java(TM) SE Runtime Environment (build 1.8.0_231-b11)
Java HotSpot(TM) 64-Bit Server VM (build 25.231-b11, mixed mode)
Note: At the time of writing this post the current stable version is 2.4.0. If you’re using Scala for development then make sure to select the Kafka version corresponding to your Scala version.
2) Go to the folder where you’ve extracted Kafka, open the file server.properties in the config folder and then edit the line log.dirs=/tmp/kafka-logs to log.dirs=C:\path_where_kafka_is_extracted\kafka-logs.
Note: If you won’t change log.dirs value, you’ll keep getting the following error:
java.util.NoSuchElementException: key not found: /tmp/kafka-logs
3) Start Zookeeper
Kafka uses ZooKeeper so before starting Kafka you have to make sure that ZooKeeper is up and running. We’ll be running the single node ZooKeeper instance packaged with Kafka.
Go to your Kafka installation directory and open command prompt and start Zookeeper using the following command: