Sort strings alphabetically rather than lexicographically in Elasticsearch?

Let’s say we have a text field “name” in an elasticsearch index with the following values: Siddhant, SIDTECHNOCRAT, and sid.

Now follow the conventions mentioned in String Sorting in Elasticsearch, which talks about using a text field that is not analyzed for sorting.

I am assuming that you’ve followed the conventions mentioned in the above link.

For the demo I am using Elasticsearch 6.4.1.

Let’s index the names:

PUT /my_index/_doc/1
{ "name": "Siddhant" }

PUT /my_index/_doc/2
{ "name": "SIDTECHNOCRAT" }

PUT /my_index/_doc/3
{ "name": "sid" }

Let’s sort the names:

GET /my_index/user/_search?sort=name.keyword

Output:

SIDTECHNOCRAT 
Siddhant 
sid

Wait!! weren’t you expecting the result to be sid, Siddhant and SIDTECHNOCRAT.

You’re getting the results in the above order because the bytes used to represent capital letters have a lower ASCII value than the bytes used to represent lowercase letters, and as an international accepted standard, Elasticsearch follows ASCII sort order which is why the names are sorted with lowest bytes first.

In other words we’re getting results in lexicographical order which is perfectly fine for a machine but does not make much sense to human beings (expecting results to be sorted in alphabetical order).

If you want the results to be sorted in alphabetical order you should index each name in a way that ES should ignore the case while indexing.

To achieve this create a custom analyzer combining keyword tokenizer and lowercase token filter.

Then configure the text field you want to sort with the custom analyzer:

PUT /my_index
{
  "settings" : {
    "analysis" : {
      "analyzer" : {
        "custom_keyword_analyzer" : {
          "tokenizer" : "keyword",
          "filter" : ["lowercase"]
        }
      }
    }
  },
  "mappings" : {
    "_doc" : {
      "properties" : {
        "name" : {
          "type" : "text",
          "fields" : {
            "raw" : {
              "type" : "text",
              "analyzer" : "custom_keyword_analyzer",
              "fielddata": true
            }
          }
        }
      }
    }
  }
}
  • keyword tokenizer is used to consider the string as a whole and not splitting up into tokens.
  • lowercase filter is used to convert the token into small letters.
  • custom_keyword_analyzer is used with the multifield raw to sort the results alphabetically.

Index your data:

POST my_index/_doc/1
{ "name" : "Siddhant" }

POST my_index/_doc/2
{ "name" : "SIDTECHNOCRAT" }

POST my_index/_doc/3
{ "name" : "sid" }

Perform sort:

GET my_index/_doc/_search?sort=name.raw

Output:

sid 
Siddhant 
SIDTECHNOCRAT

Bingo !! You’ve got what you were expecting.

How to create an Elasticsearch 6.4.1 Plugin

A plugin provides a way to extend or enhance the basic functionality of Elasticsearch without having to fork it from GitHub.

Elasticsearch supports a plugin framework which provides many custom plugin classes that we can extend to create our own custom plugin.

A plugin is just a Zip file containing one or more jar files with compiled code and resources. Once a plugin is packaged, it can be easily added to an Elasticsearch installation using a single command.

This post will explain how to create an Elasticsearch plugin for Elasticsearch 6.4.1 with maven and Eclipse IDE.

If you follow along you’ll be able to create a “Hello World!” plugin demonstrating the classic hello world example.

Cheers to the beginning 🙂

Steps to create an Elasticsearch plugin

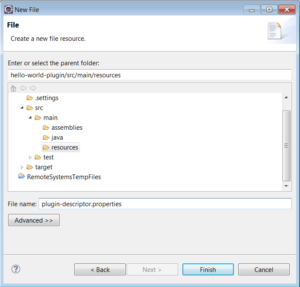
1. Setting up the plugin structure:

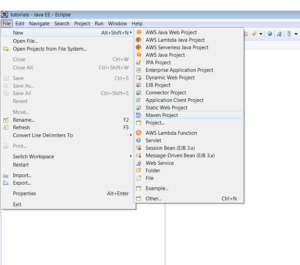
1.1) Create a maven project using Eclipse IDE (you can use any IDE, I personally prefer Eclipse and IntelliJ).


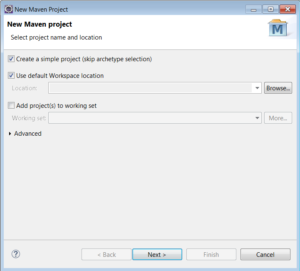
1.2) Skip the archetype selection.


1.3) Add the Group Id, Artifact Id and Name, then click finish.


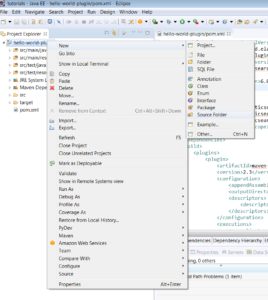
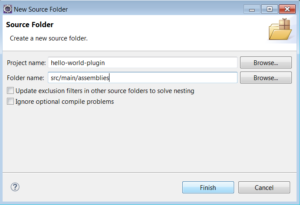
1.4) Create a source folder src/main/assemblies.


1.5) Click finish.


After this the plugin project structure should look like:

│

├── pom.xml

├── src

│   └── main

│       ├── assemblies

│       ├── java

│       └── resources

│

So the plugin skeleton is ready.

2. Configuring the plugin project:

2.1) Open the pom.xml and add elasticsearch dependency.

<properties>
  <elasticsearch.version>6.4.1</elasticsearch.version>
</properties>
<dependencies>
  <dependency>
    <groupId>org.elasticsearch</groupId>
    <artifactId>elasticsearch</artifactId>
    <version>${elasticsearch.version}</version>
    <scope>provided</scope>
  </dependency>
</dependencies>

Notice that the scope of elasticsearch dependency is provided. This is because the plugin will run in elasticsearch which is already provided.

2.2) Add the plugin descriptor file.

Elasticsearch recommends:

All plugins must contain a file called plugin-descriptor.properties.

This means you must provide a plugin-descriptor.properties which should be assembled with your plugin.

Create plugin-descriptor.properties file in scr/main/resources. 

and add the following content:

description=${project.description}
version=${project.version}
name=${project.artifactId}
classname=com.technocratsid.elasticsearch.plugin.HelloWorldPlugin
java.version=1.8
elasticsearch.version=${elasticsearch.version}

2.3) Add the plugin security policy file (Optional).

Some plugins require additional security permissions. A plugin can include an optional plugin-security.policy file containing grant statements for additional permissions..more

Create plugin-security.policy file in scr/main/resources. 

and add the following content:

grant {
permission java.security.AllPermission;
};

The above content is just a reference and you might require different set of permissions. To know more about JDK permissions refer this.

After the creation of plugin-security.policy file, you have to write proper security code around the operations requiring elevated privileges.

AccessController.doPrivileged(
  // sensitive operation
);

Note: We don’t need to perform this step for the Hello World Plugin. This is necessary if your plugin needs some security permissions. 

2.4) Create the plugin.xml file.

Create the plugin.xml file in src/main/assemblies which will be used to configure the packaging of the plugin.

and add the following content:

<?xml version="1.0"?>
<assembly>
  <id>plugin</id>
  <formats>
    <format>zip</format>
  </formats>
  <includeBaseDirectory>false</includeBaseDirectory>
  <fileSets>
    <fileSet>
      <directory>target</directory>
      <outputDirectory>/</outputDirectory>
      <includes>
        <include>*.jar</include>
      </includes>
    </fileSet>
  </fileSets>
  <files>
    <file>
      <source>${project.basedir}/src/main/resources/plugin-descriptor.properties</source>
      <outputDirectory>/</outputDirectory>
      <filtered>true</filtered>
    </file>
    <file>
      <source>${project.basedir}/src/main/resources/plugin-security.policy</source>
      <outputDirectory>/</outputDirectory>
      <filtered>false</filtered>
    </file>
  </files>
  <dependencySets>
    <dependencySet>
      <outputDirectory>/</outputDirectory>
      <unpack>false</unpack>
    </dependencySet>
  </dependencySets>
</assembly>

2.5) Declare the maven assembly plugin in the pom.xml.

<plugin>
  <groupId>org.apache.maven.plugins</groupId>
  <artifactId>maven-assembly-plugin</artifactId>
  <configuration>
    <appendAssemblyId>false</appendAssemblyId>
    <outputDirectory>${project.build.directory}/releases/</outputDirectory>
    <descriptors>
      <descriptor>${basedir}/src/main/assemblies/plugin.xml</descriptor>
    </descriptors>
  </configuration>
  <executions>
    <execution>
      <phase>package</phase>
      <goals>
        <goal>attached</goal>
      </goals>
    </execution>
  </executions>
</plugin>

2.6) Declare the maven compiler plugin in the pom.xml.

<plugin>
  <groupId>org.apache.maven.plugins</groupId>
  <artifactId>maven-compiler-plugin</artifactId>
  <version>3.5.1</version>
  <configuration>
    <source>1.8</source>
    <target>1.8</target>
  </configuration>
</plugin>

After some refactoring the complete pom.xml looks like this:

<project xmlns="http://maven.apache.org/POM/4.0.0" xmlns:xsi="http://www.w3.org/2001/XMLSchema-instance"
xsi:schemaLocation="http://maven.apache.org/POM/4.0.0 http://maven.apache.org/xsd/maven-4.0.0.xsd">
<modelVersion>4.0.0</modelVersion>
<groupId>com.technocratsid.elasticsearch.plugin</groupId>
<artifactId>hello-world-plugin</artifactId>
<version>0.0.1-SNAPSHOT</version>
<name>Hello World Elasticsearch Plugin</name>
<properties>
  <maven.compiler.source>1.8</maven.compiler.source>
  <maven.compiler.target>1.8</maven.compiler.target>
  <elasticsearch.version>6.4.1</elasticsearch.version>
  <maven.compiler.plugin.version>3.5.1</maven.compiler.plugin.version>
  <elasticsearch.assembly.descriptor>${basedir}/src/main/assemblies/plugin.xml</elasticsearch.assembly.descriptor>
</properties>
<dependencies>
  <dependency>
    <groupId>org.elasticsearch</groupId>
    <artifactId>elasticsearch</artifactId>
    <version>${elasticsearch.version}</version>
    <scope>provided</scope>
  </dependency>
</dependencies>
<build>
  <plugins>
    <plugin>
      <groupId>org.apache.maven.plugins</groupId>
      <artifactId>maven-compiler-plugin</artifactId>
      <version>${maven.compiler.plugin.version}</version>
      <configuration>
        <source>${maven.compiler.target}</source>
        <target>${maven.compiler.target}</target>
      </configuration>
    </plugin>
    <plugin>
      <groupId>org.apache.maven.plugins</groupId>
      <artifactId>maven-assembly-plugin</artifactId>
      <configuration>
        <appendAssemblyId>false</appendAssemblyId>
        <outputDirectory>${project.build.directory}/releases/</outputDirectory>
        <descriptors>
          <descriptor>${elasticsearch.assembly.descriptor}</descriptor>
        </descriptors>
      </configuration>
      <executions>
        <execution>
          <phase>package</phase>
          <goals>
            <goal>attached</goal>
          </goals>
        </execution>
      </executions>
    </plugin>
  </plugins>
</build>
</project>

3. Create the plugin classes:

3.1) Creating a new REST endpoint _hello. 

To create a new endpoint we should extend org.elasticsearch.rest.BaseRestHandler. But before doing that, initialize it in the plugin.

Create a class HelloWorldPlugin which extends org.elasticsearch.plugins.Plugin and implements the interface org.elasticsearch.plugins.ActionPlugin.

public class HelloWorldPlugin extends Plugin implements ActionPlugin {
}

Implement the getRestHandlers method:

public class HelloWorldPlugin extends Plugin implements ActionPlugin {
@Override
public List<RestHandler> getRestHandlers(final Settings settings,
                                         final RestController restController,
                                         final ClusterSettings clusterSettings,
                                         final IndexScopedSettings indexScopedSettings,
                                         final SettingsFilter settingsFilter,
                                         final IndexNameExpressionResolver indexNameExpressionResolver,
                                         final Supplier<DiscoveryNodes> nodesInCluster) {
        return Collections.singletonList(new HelloWorldRestAction(settings, restController));
    }
}

Now implement the HelloWorldRestAction class:

Create a class HelloWorldRestAction which extends org.elasticsearch.rest.BaseRestHandler.

public class HelloWorldRestAction extends BaseRestHandler {
    @Inject
    public HelloWorldRestAction(Settings settings, RestController restController) {
          super(settings);
    }

    @Override
    public String getName() {
          // TODO Auto-generated method stub
          return null;
    }

    @Override
    protected RestChannelConsumer prepareRequest(RestRequest request, NodeClient client) throws IOException {
          // TODO Auto-generated method stub
          return null;
     }
}

Register the endpoint _hello for a GET request:

@Inject
public HelloWorldRestAction(Settings settings, RestController restController) {
   super(settings);
   restController.registerHandler(RestRequest.Method.GET, "/_hello", this);
}

Implement the prepareRequest method to return “Hello World!” for a GET request to _hello endpoint:

@Override
protected RestChannelConsumer prepareRequest(RestRequest request, NodeClient client) throws IOException {
  return channel -> {
        XContentBuilder builder = channel.newBuilder();
        builder.startObject().field("message", "Hello World!").endObject();
        channel.sendResponse(new BytesRestResponse(RestStatus.OK, builder));
  };
}

After all these changes and some refactoring the HelloWorldRestAction class will look like:

public class HelloWorldRestAction extends BaseRestHandler {

private static String NAME = "_hello";

@Inject
public HelloWorldRestAction(Settings settings, RestController restController) {
   super(settings);
   restController.registerHandler(RestRequest.Method.GET, "/" + NAME, this);
}

@Override
public String getName() {
   return NAME;
}

@Override
protected RestChannelConsumer prepareRequest(RestRequest request, NodeClient client) throws IOException {
   return channel -> {
      XContentBuilder builder = channel.newBuilder();
      builder.startObject().field("message", "HelloWorld").endObject();
      channel.sendResponse(new BytesRestResponse(RestStatus.OK, builder));
   };
  }
}

4. Build the plugin:

mvn clean install

After this step you’ll find the packaged plugin Zip in target/releases folder of your plugin project.

5. Install the plugin:

You can install this plugin using the command:

bin\elasticsearch-plugin install file:///path/to/target/releases/hello-world-plugin-0.0.1-SNAPSHOT.zip

6. Test the plugin:

After installing the plugin start Elasticsearch.

bin\elasticsearch

Perform the following request in Kibana:

GET /_hello

Or, use curl:

curl -XGET "http://localhost:9200/_hello

Output:

{
  "message": "HelloWorld"
}

7. Conclusion:

You’ve got a head start !!

Now sky is the limit 🙂


References

String sorting in Elasticsearch

We should not sort on analyzed text field instead we should sort on not_analyzed text field.

Let’s understand this with an example:

Index some documents with a text field “name”.

POST my_index/_doc/1
{
  "name" : "technocrat sid"
}

POST my_index/_doc/2
{
  "name" : "siddhant01"
}

POST my_index/_doc/3
{
  "name" : "sid 01"
}

POST my_index/_doc/4
{
  "name" : "agnihotry siddhant"
}

Let’s sort the results in ascending order:

GET my_index/_search
{
  "sort": [
  {
    "name": {
      "order": "asc"
    }
  }
 ]
}

We get the results in the order:

sid 01

agnihotry siddhant

technocrat sid

siddhant 01

Wait !! Why did we not get the results in alphabetical order? We were expecting something like this:

agnihotry siddhant

sid 01

siddhant 01

technocrat sid


Reason that we did not get the results in the above order:

As we haven’t specified index mapping beforehand, we are relying on default mapping.  So in this case, the text field above will be analyzed with Standard Analyzer by default which mainly splits the text with spaces and removes stop words.

i.e. if we analyze “agnihotry siddhant”, it results in two terms “agnihotry” & “siddhant”.

which means when we index the text it is stored into tokens,

text --> tokens 
technocrat sid --> technocrat, sid 
siddhant01 --> siddhant01 
sid 01 --> sid, 01 
agnihotry siddhant --> agnihotry, siddhant


But we probably want to sort alphabetically on the first term, then on the second term, and so forth. In this case we should consider the text as whole instead of splitting it into tokens.

i.e. we should consider “technocrat sid”, “sid 01” and “agnihotry siddhant” as a whole which means we should not analyze the text field.

How do we not analyze a text field?

Before Elasticsearch 5.x

Before Elasticsearch 5.x text fields were stored as string. In order to consider a string field as a whole it should not be analyzed but we still need to perform a full text query on that same field.

So what we really want is to index the same field in two different ways, i.e. we want to sort and search on the same string field.

We can do this using multifield mapping:

"name": {
  "type": "string",
    "fields": {
      "raw": {
        "type":  "string",
        "index": "not_analyzed"
      }
   }
}  

The main name field is same as before: an analyzed full-text field. The new name.raw sub field is not_analyzed.

That means we can use the name field for search and name.raw field for sorting:

GET my_index/_search
{
  "sort": [
  {
    "name.raw": {
      "order": "asc"
    }
  }
 ]
}

After Elasticsearh 5.x

In Elasticsearch 5.x, the string type has been removed and there are now two new types: text, which should be used for full-text search, and keyword, which should be used for sort.

For instance, if you index the following document:

{
  "name": "sid"
}

Then the following dynamic mappings will be created:

{
  "name": {
    "type" "text",
    "fields": {
      "keyword": {
        "type": "keyword",
        "ignore_above": 256
      }
    }
  }
}

So you don’t have to specify not_analyzed explicitly for a text field after ES 5.x.

You can use name.keyword for sorting:

GET my_index/_search
{
  "sort": [
  {
    "name.keyword": {
      "order": "asc"
    }
  }
 ]
}

Elasticsearch plugin for Sentiment Analysis

I have created an Elasticsearch plugin for sentiment-analysis using Stanford CoreNLP libraries. The plugin is compatible with Elasticsearch 6.4.1.

Follow the below steps to use this plugin with your elasticsearch server:

1. Install the plugin

Windows: 

bin\elasticsearch-plugin install https://github.com/TechnocratSid/elastic-sentiment-analysis-plugin/releases/download/6.4.1/elastic-sentiment-analyis-plugin-6.4.1.zip

Unix:

sudo bin/elasticsearch-plugin install https://github.com/TechnocratSid/elastic-sentiment-analysis-plugin/releases/download/6.4.1/elastic-sentiment-analyis-plugin-6.4.1.zip

2. Starting Elasticsearch

How you start Elasticsearch depends on how you installed it. I’ve installed Elasticsearch on Windows with a .zip package, in my case I can start Elasticsearch from the command line using the following command:

.\bin\elasticsearch.bat

Note: To setup Elasticsearch follow the link Set up Elasticsearch.

3. Open Kibana

Perform the request mentioned below:

Example1:

POST _sentiment
{
"text" : "He is very happy"
}

Output: 

{
"sentiment_score": 3,
"sentiment_type": "Positive",
"very_positive": "38.0%",
"positive": "59.0%",
"neutral": "2.0%",
"negative": "0.0%",
"very_negative": "0.0%"
}

Example2:

POST _sentiment
{
"text" : "He is bad"
}

Output:

{
"sentiment_score": 1,
"sentiment_type": "Negative",
"very_positive": "1.0%",
"positive": "2.0%",
"neutral": "13.0%",
"negative": "66.0%",
"very_negative": "19.0%"
}

If you don’t want to use kibana use curl instead.

If you want to hack into the code check out the github link.

What is Type Safety ?

Definition

Type safety is prevention of typed errors in a programming language.

type error occurs when someone attempts to perform an operation on a value that doesn’t support that operation.

In simple words, type safety makes sure that an operation o which is meant to be performed on a data type x cannot be performed on data type y which does not support operation o.

That is, the language will not allow you to to execute o(y).

Example: 

Let’s consider JavaScript which is not type safe:

<!DOCTYPE html>
<html>
<body>
<script>
var number = 10; // numeric value
var string = "10"; // string value
var sum = number + string; // numeric + string
document.write(sum);
</script>
</body>
</html>

Output:

1010

The output is the concatenation of number and string.

Important point to note here is that JavaScript is allowing you to perform an arithmetic operation between an int and string.

As JavaScript is not type safe, you can add a numeric and string without restriction. This can lead to typed errors in type safe programming languages.

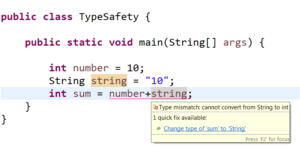
Let’s consider java which is type safe:

You can clearly observe that in java the compiler validates the types while compiling and throwing a compile time exception:

Type mismatch: cannot convert from String to int


As java is type safe, you cannot perform an arithmetic operation between an int and string.

Take away

Type-safe code won’t allow any invalid operation on an object and the operation’s validity depends on the type of the object.

Example of Java 8 Streams groupingBy feature

Statement: Let’s say you have a list of integers which you want to group into even and odd numbers.

Create a list of integers with four values 1,2,3 and 4:

List<Integer> numbers = new ArrayList<>();
numbers.add(1);
numbers.add(2);
numbers.add(3);
numbers.add(4);

Now group the list into odd and even numbers:

Map<String, List<Integer>> numberGroups= 
numbers.stream().collect(Collectors.groupingBy(i -> i%2 != 0 ? "ODD" : "EVEN"));

This returns a map of (“ODD/EVEN” -> numbers).

Printing the segregated list along with its offset (ODD/EVEN):

for (String offset : numberGroups.keySet()) {
  for (Integer i : numberGroups.get(offset)) {
    System.out.println(offset +":"+i);
  }
}

Outputs:

EVEN:2
EVEN:4
ODD:1
ODD:3

Refer Github for complete program.

Usage of Index Alias in Elasticsearch

An index alias is another name for an index or group of indices. It can substitute the original index name in any API.

Using index alias you can:

  • Create “views” on a subset of the documents in an index.
  • Group multiple indices under same name (This is helpful if you want to perform a single query on multiple indices at the same time).

Use Case

A possible use case is when your application has to switch from an old index to a new index with zero downtime.

Let’s say you want to re-index an index because of some reasons and you’re not using aliases with your index then you need to update your application to use the new index name.

How this is helpful?

Assume that your application is using the alias instead of an index name.

Let’s create an index:

PUT /myindex

Create its alias:

PUT /myindex/_alias/myalias

Now you’ve decided to reindex your index (maybe you want to change the existing mapping).

Once documents have been reindexed correctly, you can switch your alias to point to the new index.

Note: You need to remove the alias from the old index at the same time as we add it to the new index. You can do it using _aliases endpoint atomically.

Reference : Elasticsearch Definitive Guide

Elasticsearch 6.x Analyzers

Elasticsearch Analyzer is a wrapper which wraps three functions:
  • Character filter: Mainly used to strip off some unused characters or change some characters.
  • Tokenizer: Breaks a text into individual tokens(or words) based on certain factors like whitespace, ngram etc.
  • Token filter: It receives the individual tokens from tokenizer and then applies some filters on it (example changing uppercase terms to lowercase).

In a nutshell, an analyzer is used to tell elasticsearch how the text/phrase should be indexed and searched.

Why do we need analyzers?

Analyzers are generally used when you want to index a text or phrase. It is useful to break the text into words so that you can search on terms to get the document.

Example: Let’s say you have an index (my_index) with a field “intro” and you index a document:

{ “intro” : “Hi there I am sid”} 

The following requests are performed in Kibana:

  • Create an index my_index:
PUT my_index
  • Put index mapping:
PUT my_index/_mapping/doc
{
  "properties": {
   "intro" : {
    "type": "keyword",
    "index": true
   }
  }
}
  • Index data:
POST my_index/doc/1
{
  "intro": "Hi there I am sid"
}

keyword type is not analyzed so the above text “Hi there I am sid” is indexed as it is i.e. it is not split into tokens.

If you want to query the above document you will have to write the complete phrase

i.e. (find documents where intro = “Hi there I am sid”)

The query will return the indexed document:

GET my_index/_search
{
  "query": {
   "match": {
    "intro": "Hi there I am sid"
   }
  }
}

But this will not:

GET my_index/_search
{
  "query": {
   "match": {
    "intro": "Hi there"
   }
  }
}

But if the phrase is indexed as tokens then even if you query for a token (find documents where intro=”sid”) you’ll get the document.

POST my_index2/doc/1
{
  "intro": "Hi there I am sid"
}

Note: By default standard analyzer is used for all text fields and it provides grammar based tokenization.

GET my_index2/_search
{
  "query": {
   "match": {
    "intro": "sid"
   }
  }
}

The above query will return the document.

Hope this is helpful !

Reference: My stackoverflow answer.

Why ES 6.x doesn’t allow multiple types?

Before Elasticsearch6.x, the analogy wrt Relational Databases was:

Relational DB ⇒ Databases ⇒ Tables ⇒ Rows ⇒ Columns
Elasticsearch ⇒ Indices ⇒ Types ⇒ Documents ⇒ Fields

which led to incorrect assumptions.

SQL tables are independent of each other and if two tables have same column names then they will be stored separately and even they can have different definitions (eg: Table_1 & Table_2 have a common column name “date” which can have different meaning for both the tables), which is not the case in elastic mapping types. Internally, fields that have same names in different mapping types are stored as same Lucene field, having said that, it implies that both the fields should have the same mapping definition. This breaks the analogy mentioned above.

So in order to break this analogy ES6.x doesn’t allow more than one mapping type for an index. Even they are planning to remove _type in the upcoming versions.

Question: How you’re going to differentiate documents for the same index then? 

Answer: You can do this in the following ways:

  • Add a custom field type in the index definition.
  • Make a separate index for each type.

How to re-index an index in Elasticsearch using Java ?

To re-index an index using java, build a re-index request using ReindexRequestBuilder API like:

ReindexRequestBuilder reindexRequest = 
new ReindexRequestBuilder(client,ReindexAction.INSTANCE)
    .source("source_index")
    .destination("destination_index")
    .refresh(true);

After creating a request execute the request:

reindexRequest.execute();

To validate whether the request is executed or not add a validation check:

if(copy.execute().isDone()) {
System.out.println("Request is executed");
}

Bingo! Your index is re-indexed.